The Table Mapper
The Table Mapper is an interactive visual interface where you establish the relationships between database table columns and ASBO logical attributes. It opens automatically once you select a table in the Table Selection Wizard.
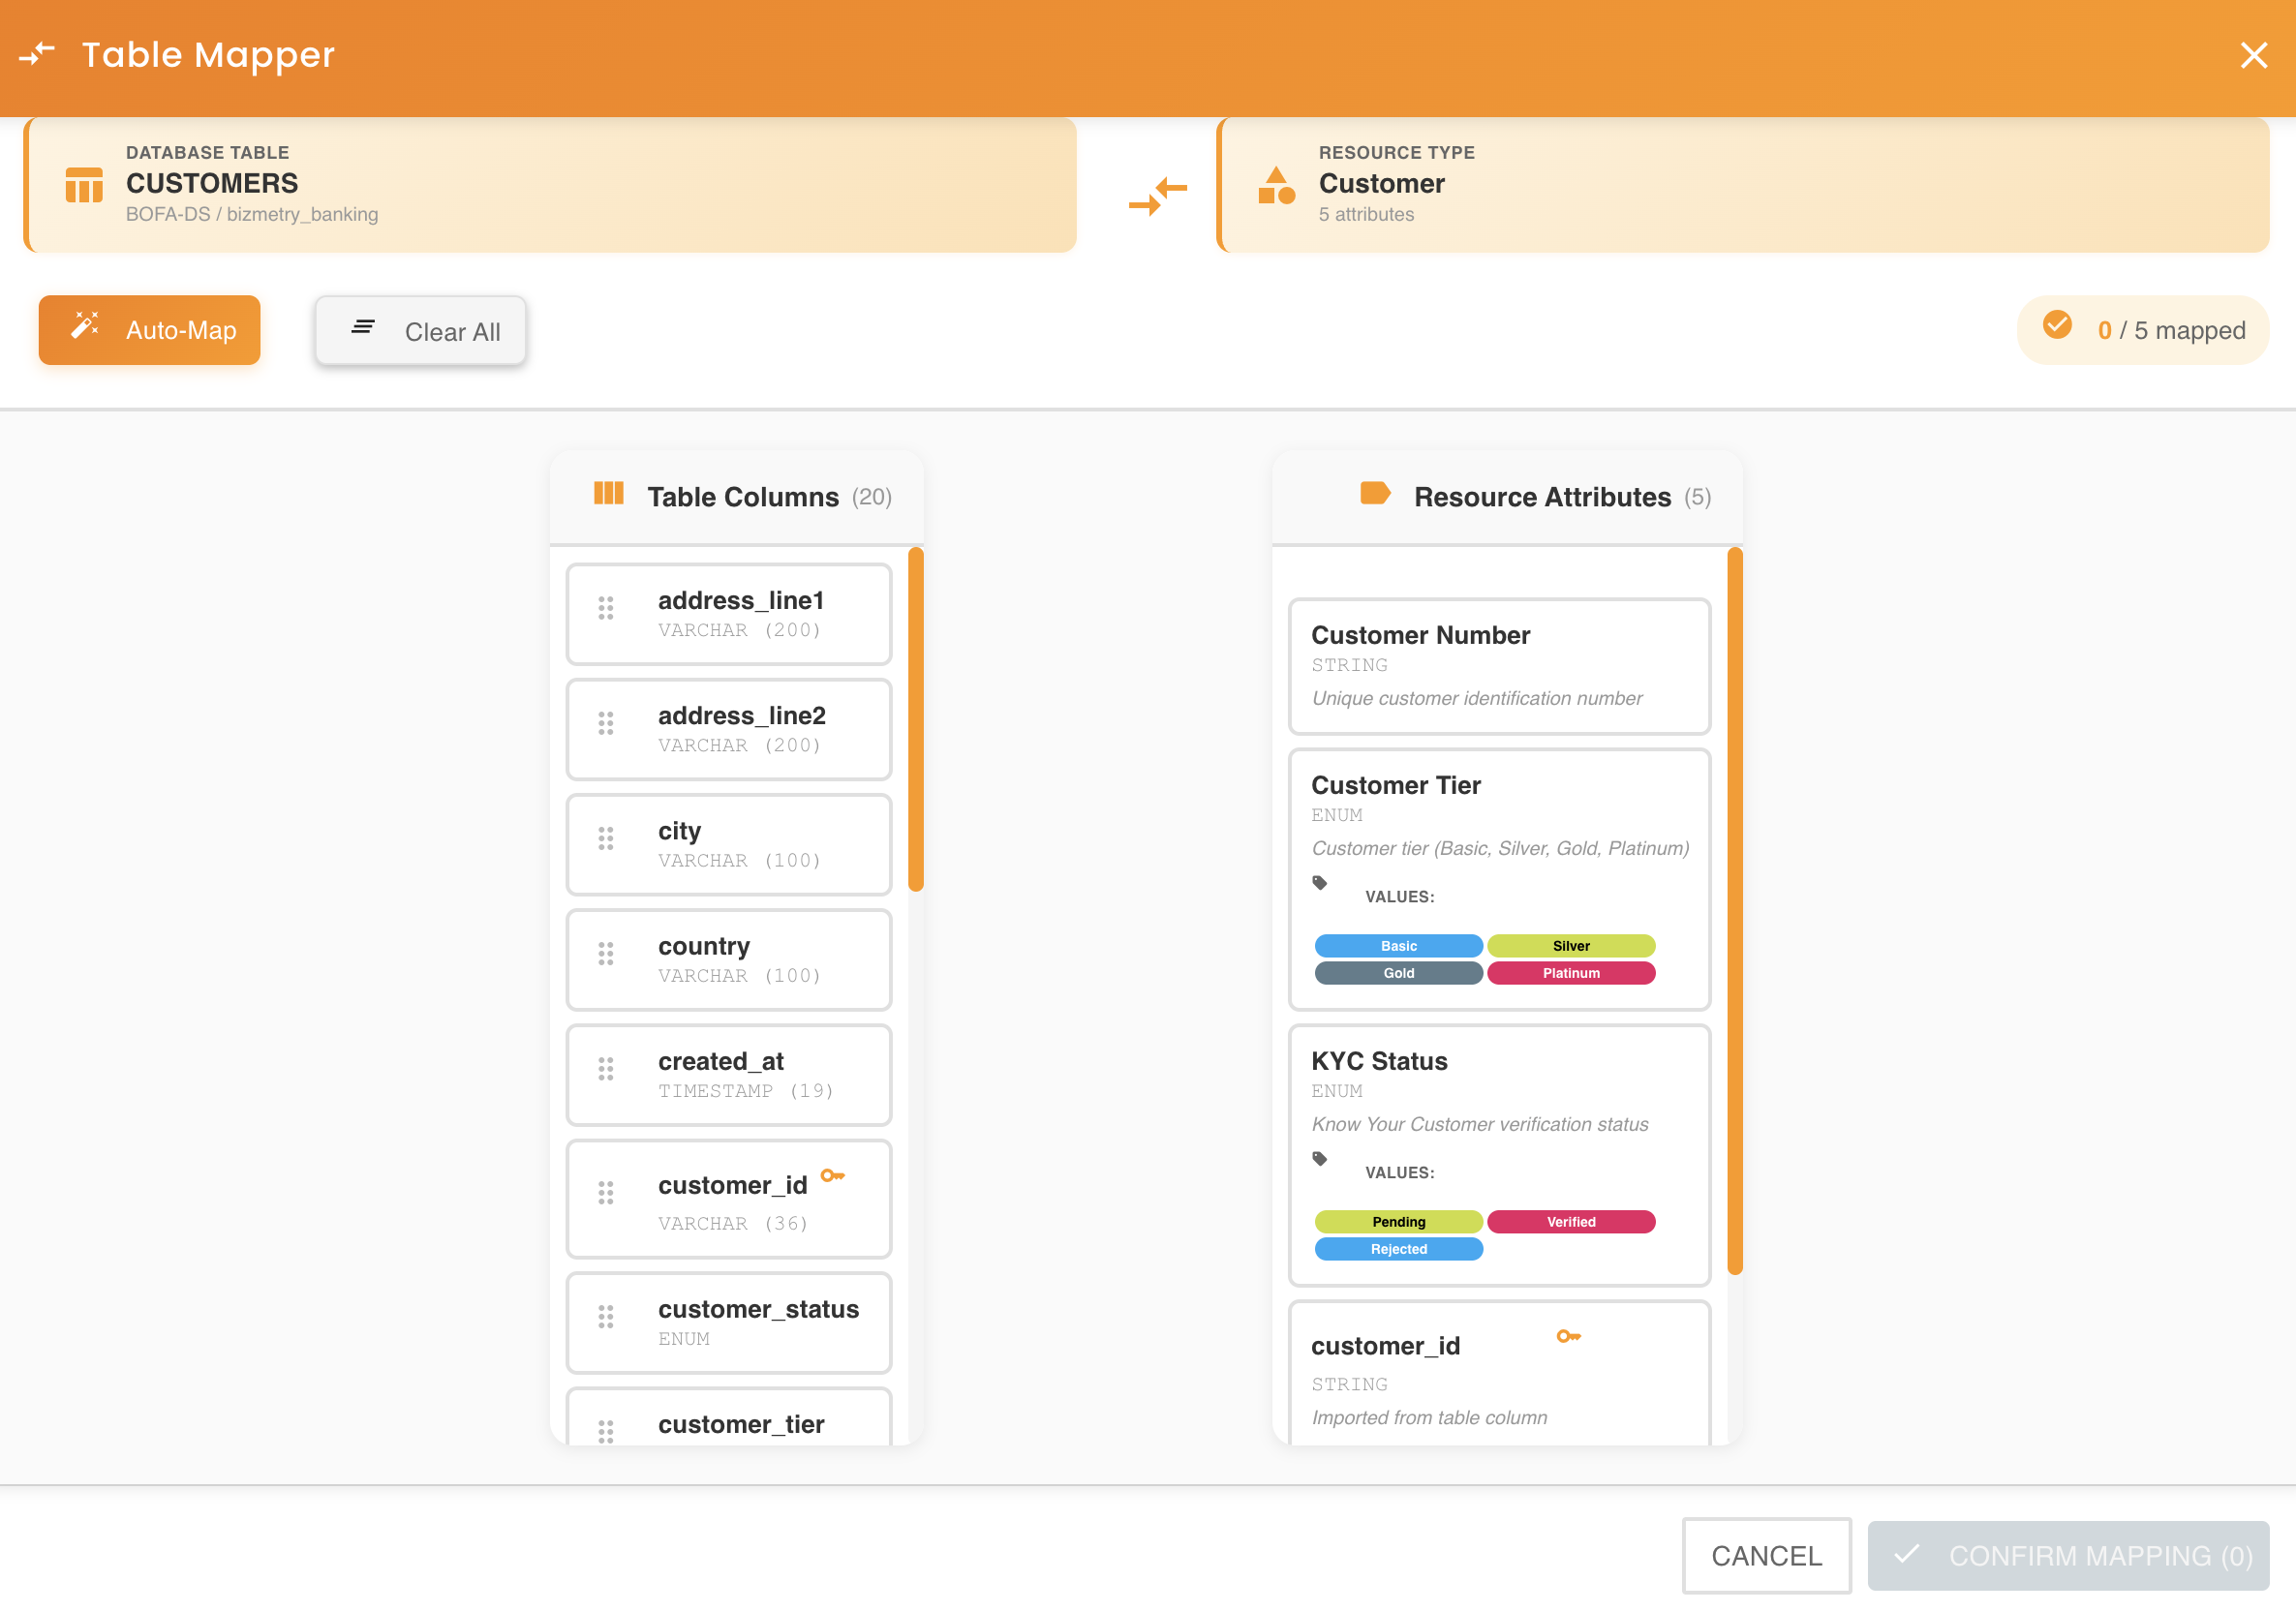
Interface Layout
The Table Mapper uses a two-panel design for intuitive drag-and-drop operations:
Left Panel: Database Columns
Displays all columns detected in the selected database table:
- Column name: The physical column name from the database
- Data type: The database-specific data type (e.g., VARCHAR, INTEGER, TIMESTAMP)
- Constraints: Visual indicators for primary keys, foreign keys, or required fields
- Draggable: Click and hold on a column to start a live connector wire toward the right panel
Right Panel: ASBO Attributes
Shows the logical attributes defined in the ASBO:
- Attribute name: The logical business attribute name
- Data type: The BizMetry logical data type
- Status: Mapped or unmapped status indicator
- Drop targets: Each attribute serves as a drop target for columns
- Special badges: An attribute's name can carry a PK (Primary Key), RN (Resource Name), or RD (Resource Description) badge, marking it for that special role in the ASBO
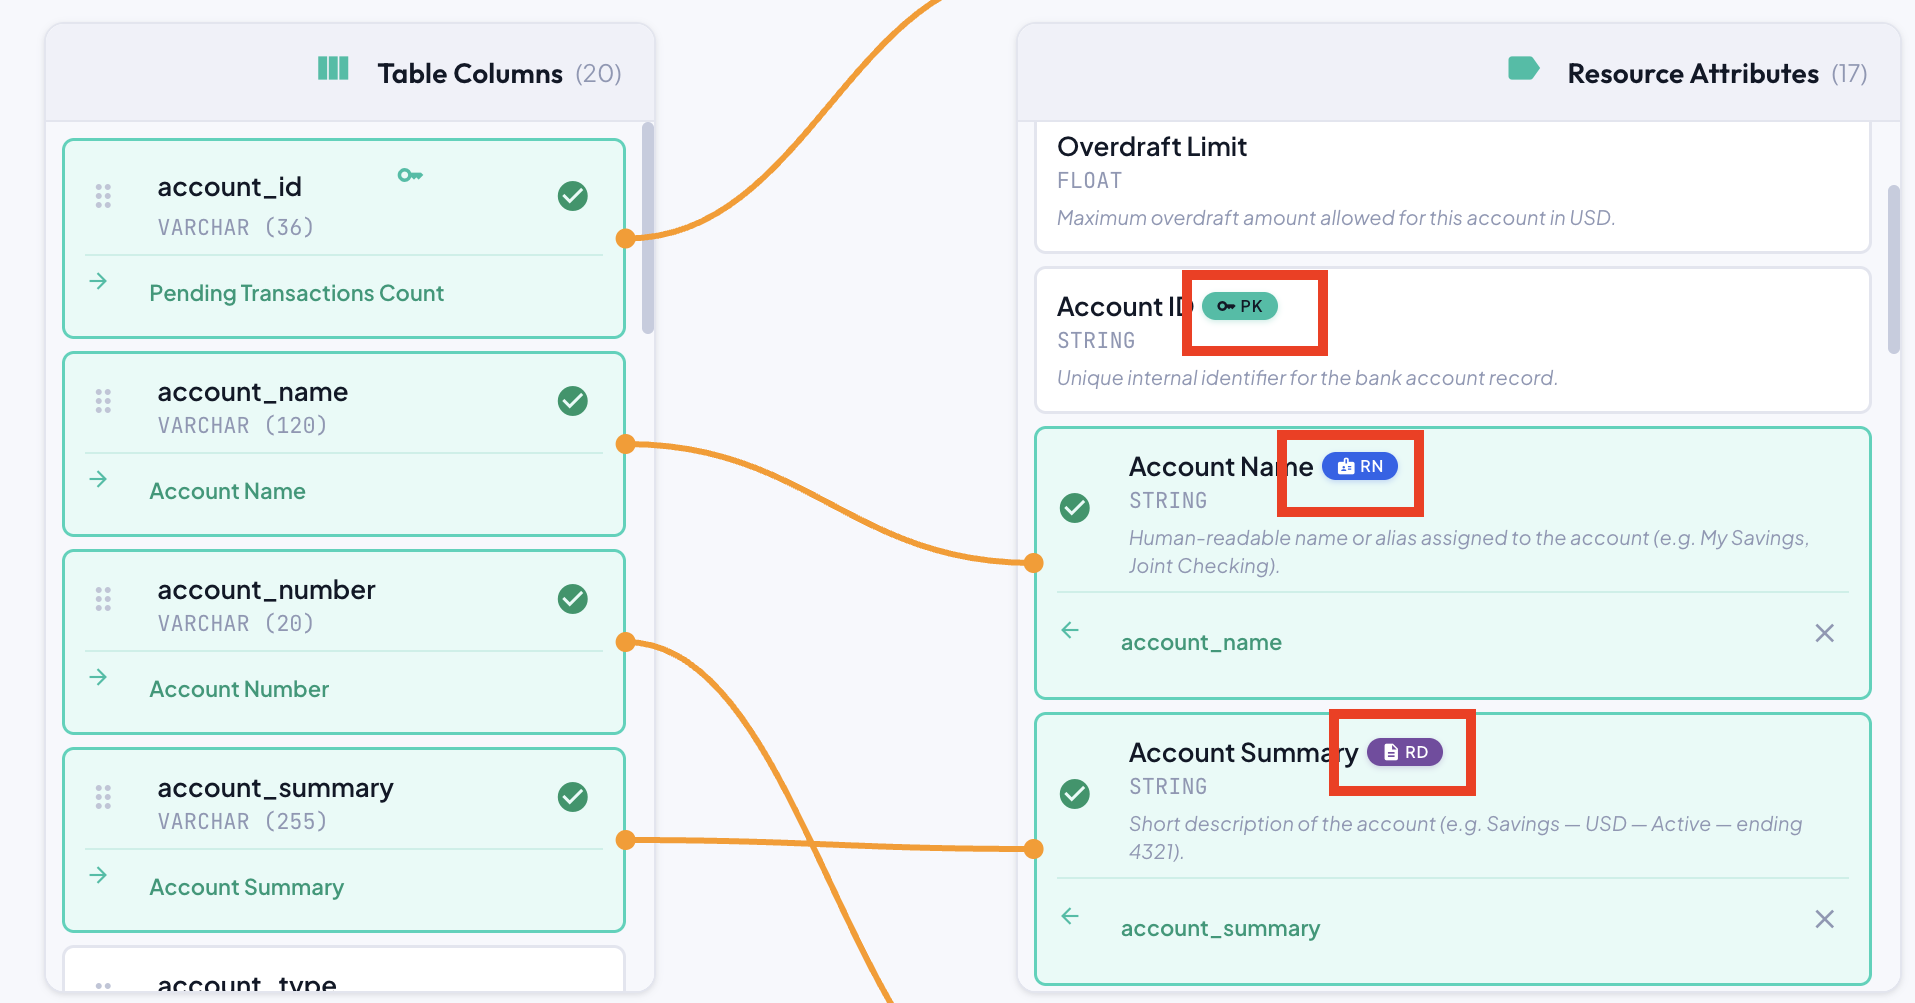
Live Wire Feedback
Dragging in the Table Mapper is driven by a live connector wire — a curved line that follows your cursor in real time and snaps onto whatever you're hovering, before you even release the mouse:
- Dragging freely: the wire is a dashed teal line while it isn't over any target
- Hovering a valid target: the wire snaps solid and turns orange, and the attribute highlights
- Hovering an already-mapped attribute: the wire turns dashed red and the attribute dims — this drop would be rejected
- Every already-mapped attribute dims slightly as soon as you start dragging, so you can see at a glance which ones are off-limits for this column, even before you hover them
Mapping Columns to Attributes
The core functionality of the Table Mapper is establishing column-to-attribute relationships.
Basic Drag and Drop Mapping
To create a mapping between a column and an attribute:
- Click and hold on a column in the left panel — a live connector wire appears, anchored to that column
- Drag the cursor across to the right panel; the wire follows in real time and snaps onto whatever attribute you're hovering
- Release the mouse button while hovering a valid (unmapped) attribute
When the drop is successful:
- A connection line appears, linking the column to the attribute — orange if the types are compatible, red if they aren't (see Data Type Compatibility Validation below). A small dot marks each end of the line; there's no arrowhead, since the color and the panel layout already make the direction clear
- The attribute card updates to show the mapped column name
- The column in the left panel becomes grayed out and marked as "mapped"
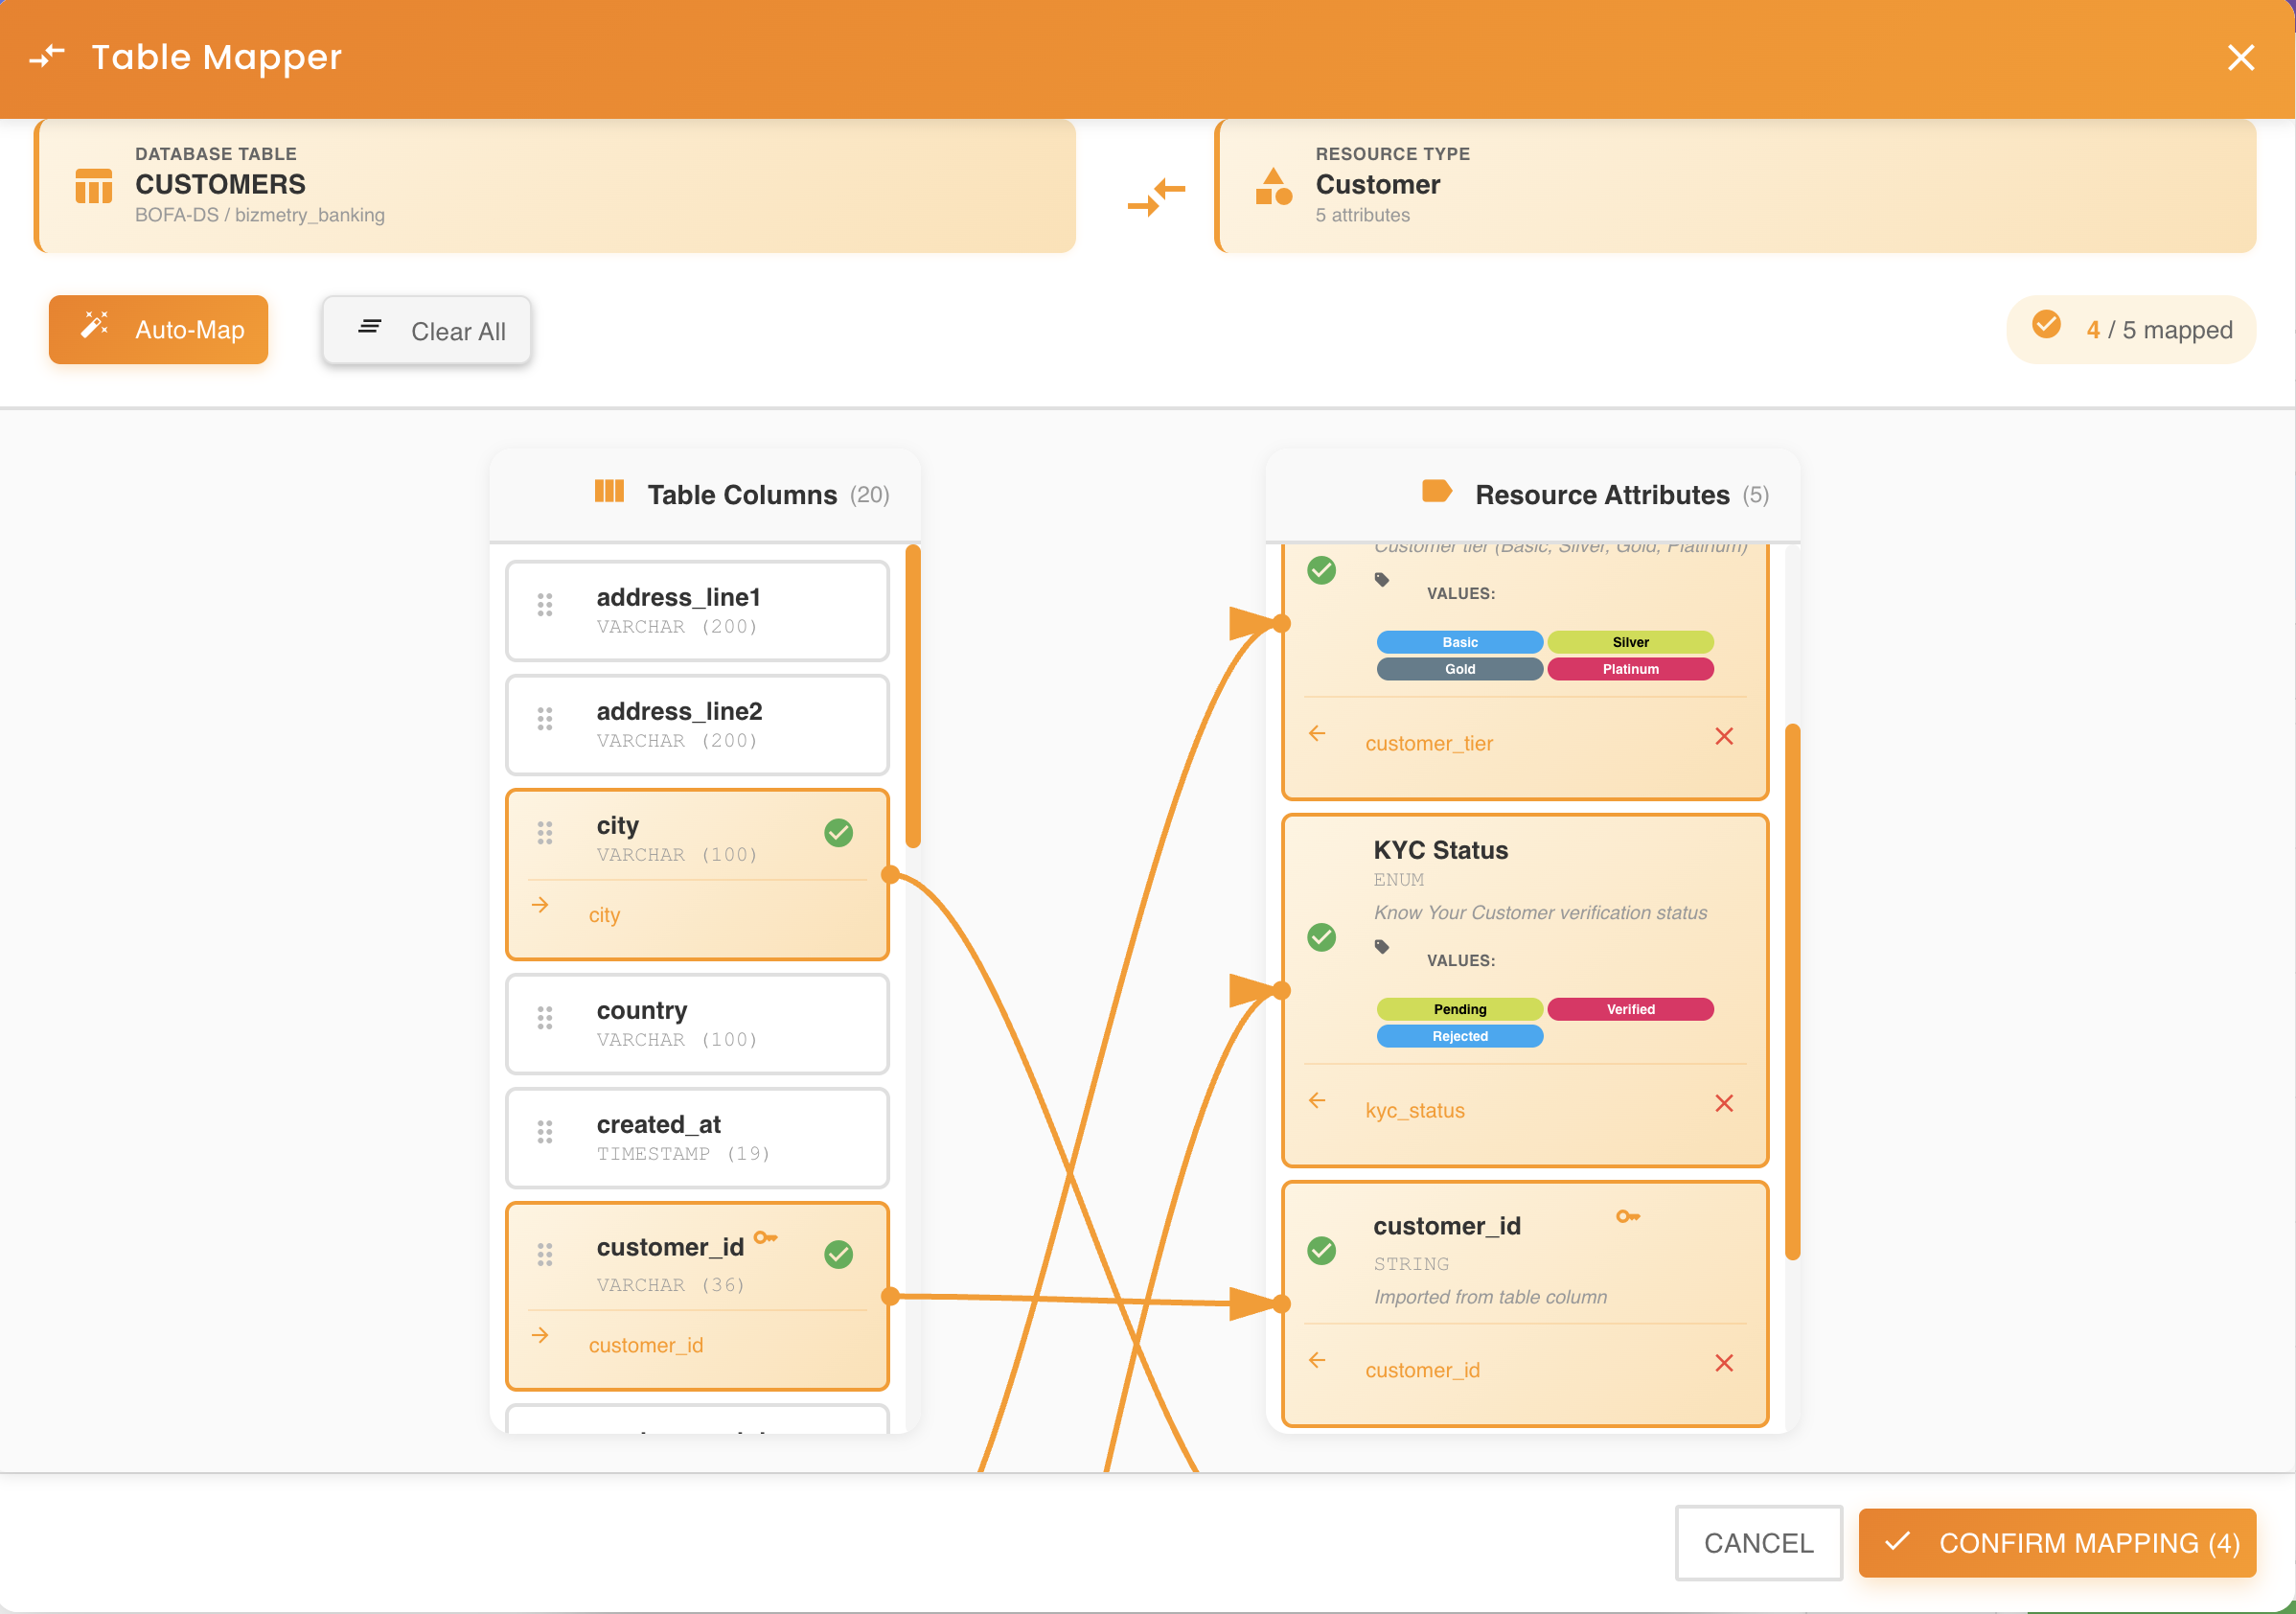
Mapping Confirmation
A checkmark or confirmation indicator appears on the attribute to show the mapping is active. The column name is displayed within the attribute card for easy reference.
Releasing over empty space or an invalid target
Releasing the mouse over empty space cancels the drag silently — nothing changes. Releasing over an attribute that's already mapped is rejected with a toast message; unmap it first (see Removing Attribute Mappings) if you want to remap it.
Data Type Compatibility Validation
When you drag a column onto an attribute, BizMetry automatically validates data type compatibility.
Compatible Types
If the column's database type is compatible with the attribute's logical type:
- The drop is accepted immediately
- The mapping is created without warnings
- No type conversion is needed
Example Compatible Mappings:
| Database Type | Logical Type | Result |
|---|---|---|
| VARCHAR(255) | String | Compatible |
| INTEGER | Number | Compatible |
| TIMESTAMP | DateTime | Compatible |
| BOOLEAN | Boolean | Compatible |
Incompatible Types
If the column's database type is not compatible with the attribute's logical type:
- The mapping is still created — right away, same as a compatible one — so you can see exactly which attributes are affected and decide how to resolve them
- The connection line and both endpoint dots render red instead of orange, and a warning message appears
- The incompatibility is clearly described, with a suggested type change recommended
- The "Confirm Mapping" button is disabled for as long as any mapping in the dialog has an unresolved type incompatibility — you can't finish anchoring with a known type conflict left in place
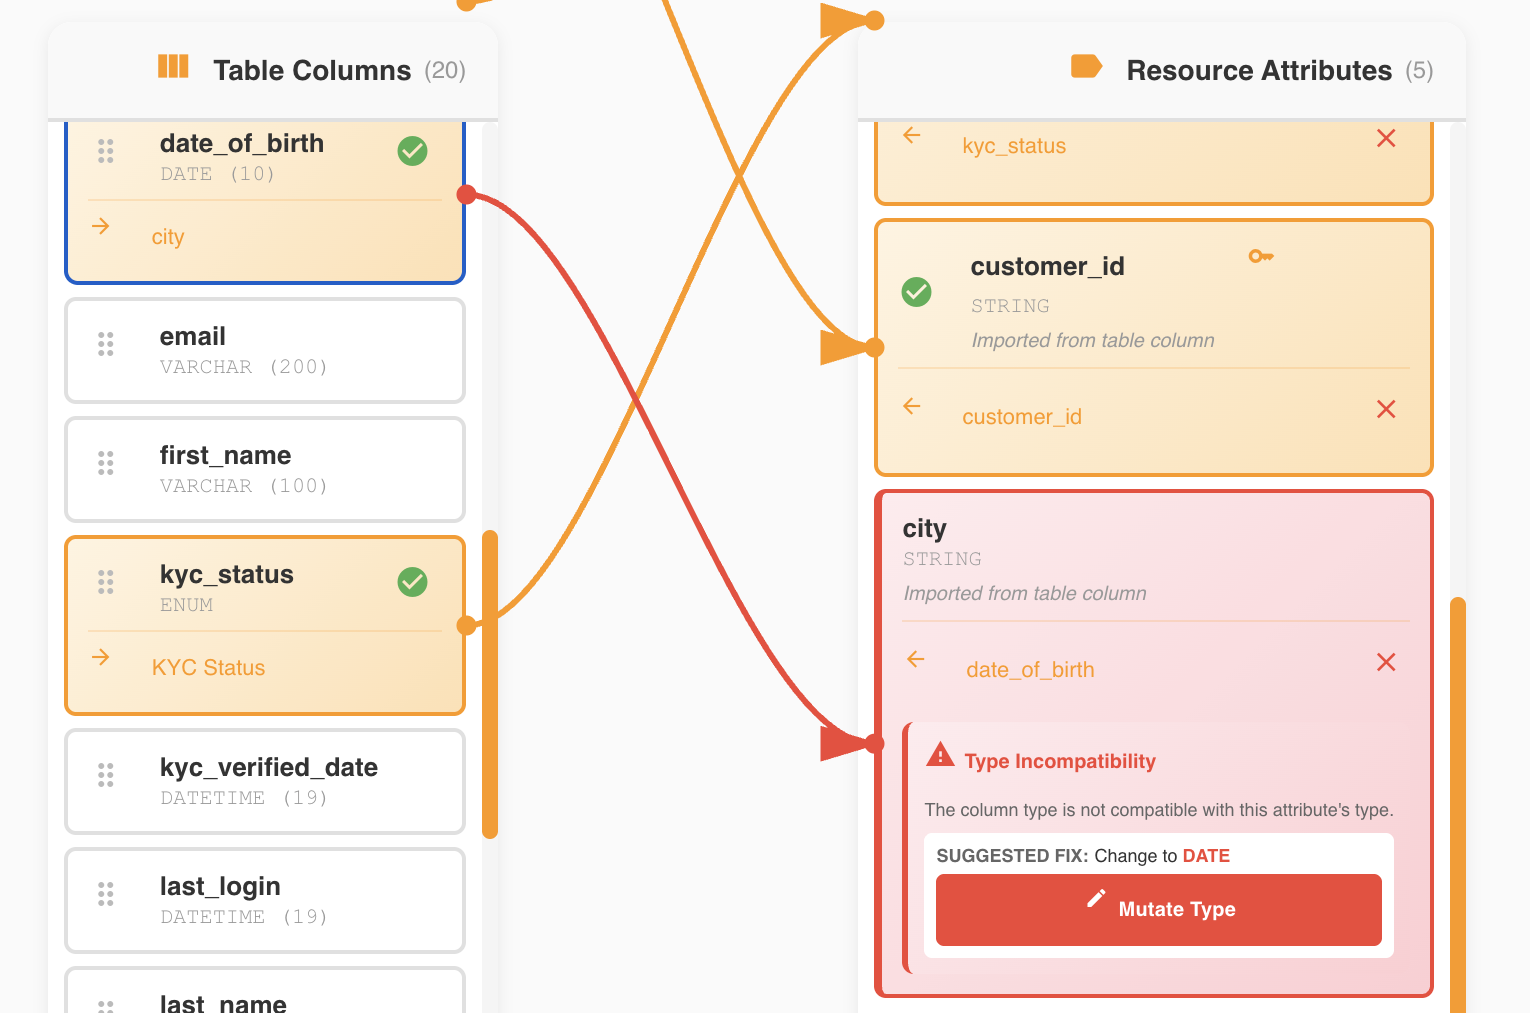
Example Warning Message:
Data Type Mismatch Detected
The column registration_date (VARCHAR) is incompatible with the attribute RegistrationDate (DateTime).
Suggested action: Change the attribute type to String, or mutate the column type to DateTime.
Click "Mutate Type" to apply the suggested change.
Resolving Type Incompatibilities
BizMetry offers automated resolution for type mismatches:
Option 1: Mutate Attribute Type (Recommended)
Click the "Mutate Type" button to automatically change the attribute's logical type to match the column:
- The attribute type is updated to be compatible with the column
- The mapping is created automatically
- The warning disappears
- The connection is established
When to Mutate
Use the Mutate Type option when:
- The column's type is the correct representation of the data
- You're comfortable changing the logical attribute definition
- Other mappings won't be affected by the type change
Option 2: Select a Different Column
If mutating the type is not appropriate:
- Cancel the current drag operation
- Identify a different column with a compatible type
- Drag the alternative column to the attribute instead
Option 3: Modify Attribute Type Manually
Before mapping:
- Access the attribute definition in the ASBO configuration
- Manually change the attribute's logical type to match the column
- Return to the Table Mapper
- Perform the drag-and-drop operation again
Creating New Attributes from Columns
The Table Mapper allows dynamic creation of new attributes directly from database columns, expanding your ASBO structure as needed.
Drop Zone for New Attributes
To create a new attribute from a column:
- Click and hold a column from the left panel to start the live wire
- Drag the cursor over any gap between attributes in the right panel — above the first one, between two existing ones, or below the last — a thin teal drop zone grows under the cursor and reads "+ Create New Attribute Here"
- Release the mouse while hovering that zone
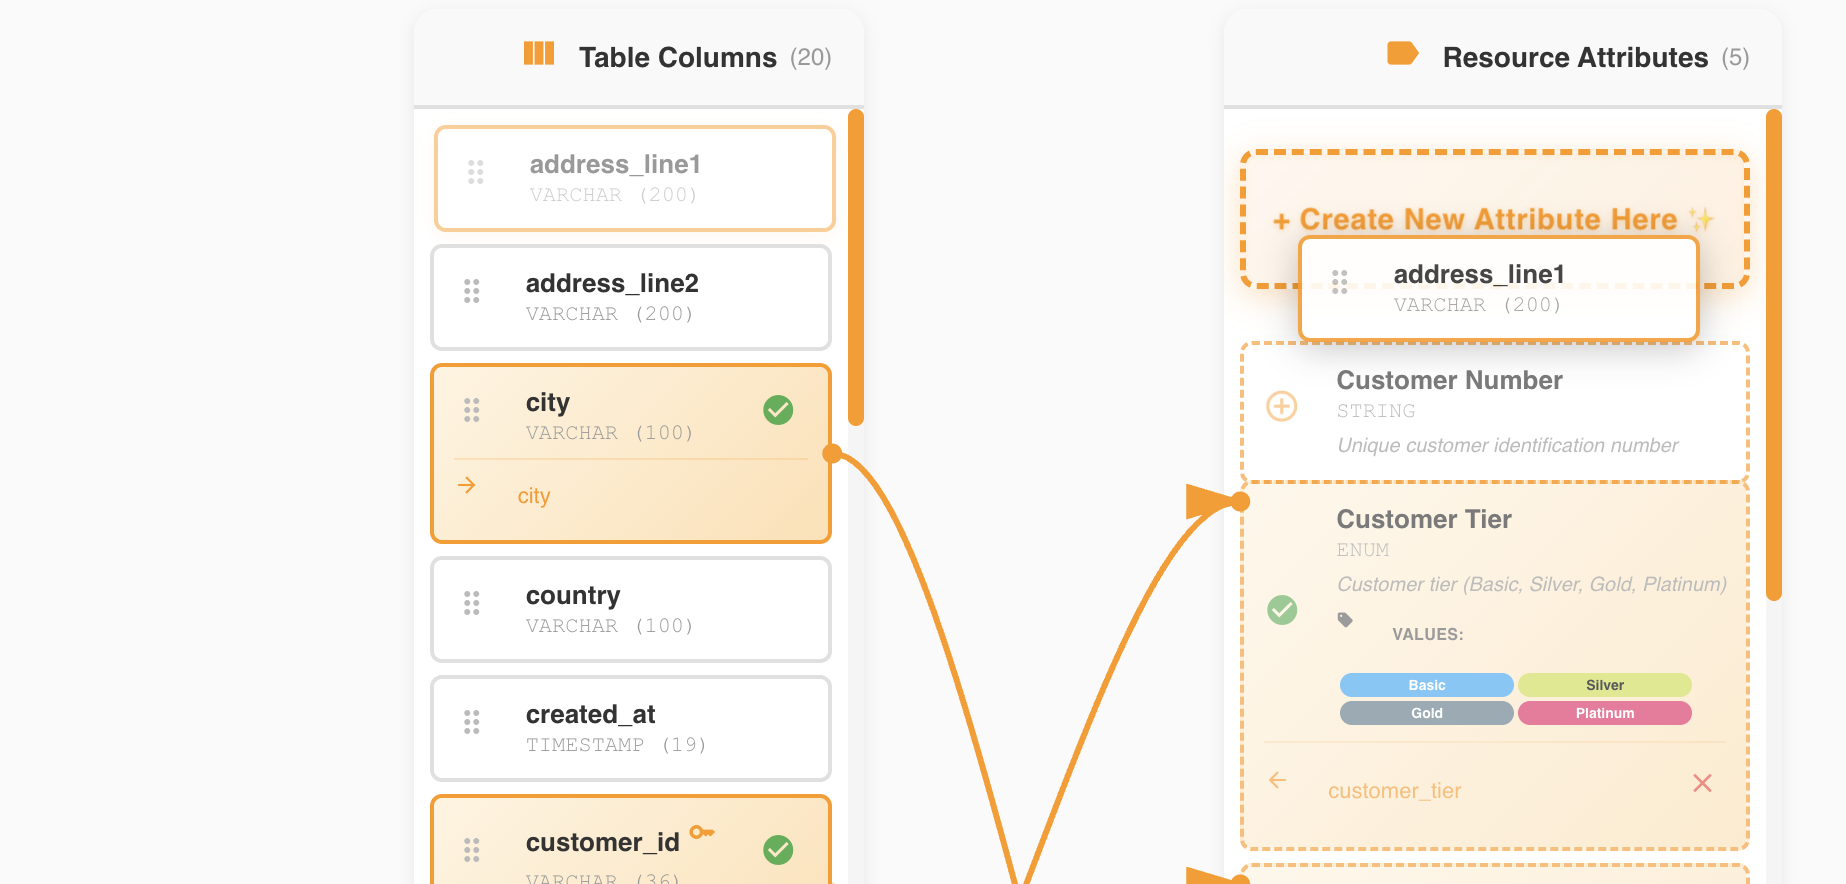
Drop Zone Activation
Every gap between attributes (including before the first one and after the last one) is a valid "create new attribute" target — it's not limited to the top of the list. The zone only visibly expands once you're hovering it directly, so you get clear feedback on exactly where the new attribute will be inserted.
Automatic Attribute Creation
When you drop a column into the new attribute drop zone:
- BizMetry creates a new attribute in the ASBO
- The attribute name matches the column name (or is intelligently transformed)
- The logical data type is automatically set based on the column's database type
- The mapping is established automatically between the new attribute and the column
- The new attribute appears at the top of the attributes list
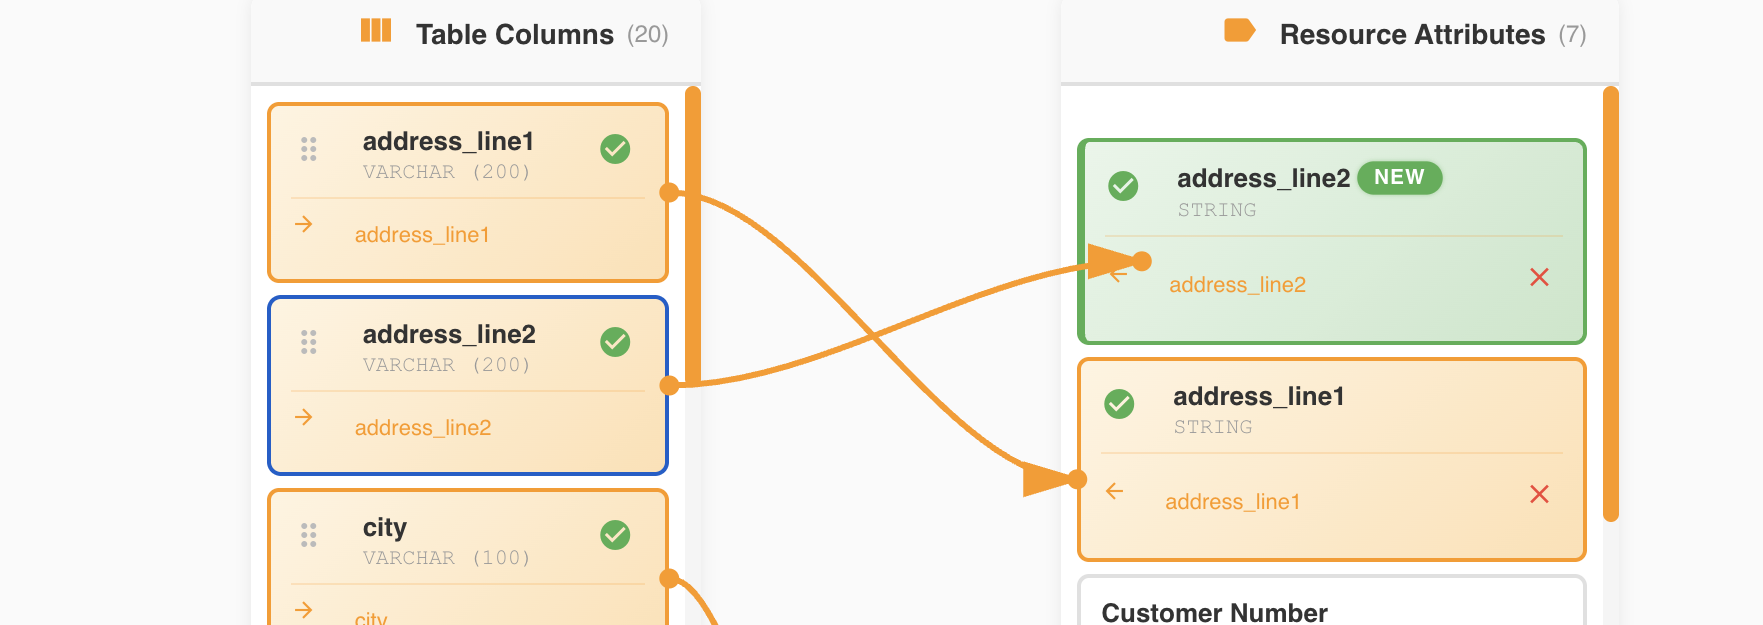
Automatic Type Mapping Examples:
| Column Type | Auto-Created Attribute Type |
|---|---|
| VARCHAR | String |
| INTEGER / BIGINT | Number |
| DECIMAL / NUMERIC | Decimal |
| DATE / TIMESTAMP | DateTime |
| BOOLEAN / BIT | Boolean |
| TEXT / CLOB | Text |
Instant Integration
The newly created attribute is immediately part of your ASBO definition and can be used for RN/RD configuration, resource imports, and all other ASBO operations.
Naming Conventions
When creating attributes from columns, BizMetry may apply naming transformations:
- Snake case to Pascal case:
client_name→ClientName - Uppercase preservation:
CLIENT_ID→ClientId - Special character removal:
client@email→ClientEmail - Reserved word handling:
select→SelectValue
Customizing Attribute Names
After automatic creation, you can edit the attribute name through the ASBO configuration if the auto-generated name doesn't fit your naming conventions.
Preventing Duplicate Attributes
BizMetry enforces uniqueness of attribute names within an ASBO to maintain data integrity.
Duplicate Detection
When you attempt to create a new attribute from a column:
- BizMetry checks if an attribute with that name already exists
- The check is case-insensitive in most cases
- If a duplicate is detected, the drop operation is blocked
Visual Feedback for Duplicates
When you drag a column whose name matches an existing attribute:
- The drop zone is disabled (grayed out or marked with a prohibition icon)
- A tooltip or message appears explaining the duplicate conflict
- The drop operation cannot be completed
Duplicate Attribute Detected
An attribute named ClientName already exists in this ASBO. You cannot create a duplicate attribute.
Options:
- Map the column to the existing
ClientNameattribute instead - Rename the existing attribute if it represents different data
- Choose a different column to create as a new attribute
Resolution Strategies
If you encounter a duplicate attribute situation:
Strategy 1: Map to Existing Attribute
If the column and existing attribute represent the same data:
- Drag the column to the existing attribute in the list
- Create the mapping to the existing attribute instead
- No new attribute is needed
Strategy 2: Rename Existing Attribute
If the existing attribute should have a different name:
- Exit the Table Mapper
- Edit the ASBO configuration
- Rename the existing attribute to something more specific
- Return to the Table Mapper
- Now create the new attribute from the column
Strategy 3: Use Column Alias
If the database allows, create a view with aliased column names:
CREATE VIEW client_data_v AS
SELECT
    client_name AS client_full_name,
    -- other columns
FROM client_table;
Then anchor to the view instead of the base table.
Removing Attribute Mappings
The Table Mapper allows you to easily remove column-to-attribute associations.
Unmapping a Column
To remove an existing mapping:
- Locate the mapped attribute in the right panel
- Find the "X" button or delete icon within the attribute card
- Click the X button
- The mapping is immediately removed
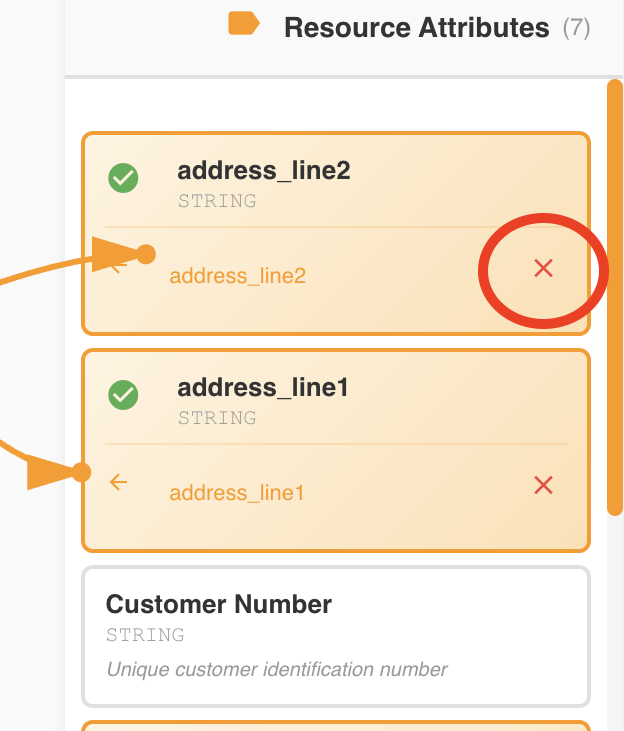
Effects of Removing a Mapping
When you remove a mapping:
- The connection line disappears
- The attribute returns to an unmapped state
- The attribute card no longer displays the column name
- The column in the left panel becomes available again for mapping
- Both the column and attribute return to their pre-mapping state
Non-Destructive Operation
Removing a mapping does not delete the attribute from the ASBO. It simply breaks the connection between the column and the attribute. The attribute remains defined in the ASBO structure.
When to Remove Mappings
Common scenarios for removing mappings:
- Incorrect mapping: You mapped the wrong column to an attribute
- Type mismatch: After reviewing, you realize the types don't align semantically
- Structural changes: The ASBO structure needs to be reorganized
- Column deprecation: The database column is being phased out
Re-mapping After Removal
After removing a mapping, you can:
- Map a different column to the same attribute
- Leave the attribute unmapped temporarily
- Delete the attribute entirely if no longer needed
- Re-map the same column after making changes
Mapping Automation Features
The Table Mapper provides automation tools to streamline the mapping process, especially useful when working with tables that have many columns or when starting fresh.
Auto-Map Feature
The Auto-Map button enables BizMetry to automatically infer mappings between columns and attributes based on their names and data types.
How Auto-Map Works
When you click the "Auto-Map" button:
- BizMetry analyzes all unmapped columns in the left panel
- Compares column names and types against unmapped attributes
- Identifies the best matches based on:
- Name similarity: Exact matches, case-insensitive matches, or close approximations
- Type compatibility: Ensures database types are compatible with logical types
- Naming conventions: Recognizes common transformations (e.g., snake_case to PascalCase)
- Creates mappings automatically for all identified matches
- Displays the results with visual indicators for newly created mappings
Incremental Mapping
Auto-Map is non-destructive and incremental:
- Existing mappings are preserved: Already mapped attributes remain unchanged
- Only adds new mappings: Auto-Map only creates mappings for unmapped attributes
- Can be run multiple times: Safe to use repeatedly without losing manual mappings
When to Use Auto-Map
Auto-Map is particularly useful in these scenarios:
- Initial anchoring: When mapping an ASBO to a table for the first time
- Column-to-attribute alignment: When column names closely match attribute names
- Large tables: When dealing with tables that have many columns
- Standardized schemas: When database naming conventions align with ASBO conventions
- Time savings: When you want to quickly establish a baseline mapping
Example Scenario:
You have an ASBO with attributes named ClientId, ClientName, Email, and CreatedDate. The database table has columns named client_id, client_name, email, and created_date.
Clicking Auto-Map will:
- Map
client_id→ClientId - Map
client_name→ClientName - Map
email→Email - Map
created_date→CreatedDate
All mappings are created automatically in seconds.
Auto-Map Matching Rules
BizMetry uses the following rules to determine matches:
Exact Match (Highest Priority):
- Column name exactly matches attribute name (case-insensitive)
- Example:
ClientId(attribute) matchesclientid(column)
Transformed Match:
- Column name matches after applying naming convention transformations
- Example:
client_name(column) matchesClientName(attribute) - Example:
CLIENT_ID(column) matchesClientId(attribute)
Partial Match (Lower Priority):
- Column name contains or is contained in attribute name
- Example:
client_email_address(column) might matchClientEmail(attribute)
Type Validation:
- All matches must have compatible data types
- Incompatible types are skipped even if names match
Review Auto-Mapped Results
After using Auto-Map:
- Review all newly created mappings
- Verify that semantic meaning aligns (not just names)
- Adjust or remove any incorrect automatic mappings
- Manually map any remaining unmapped attributes
Auto-Map Limitations
Auto-Map may not create mappings in these situations:
- No name similarity: Column and attribute names are completely different
- Type incompatibility: Column type cannot be converted to attribute type
- Already mapped: The attribute already has a mapping from previous operations
- Ambiguous matches: Multiple columns could match the same attribute
In these cases, manual mapping is required.
Clear All Mappings
The "Clear All" button removes all existing column-to-attribute mappings, allowing you to start the mapping process from scratch.
How Clear All Works
When you click the "Clear All" button:
- BizMetry immediately removes all mappings between columns and attributes — there's no confirmation step, so a misclick clears everything at once
- All attributes return to an unmapped state
- All columns become available again for mapping
- Visual connections between columns and attributes are removed from the interface
- Any type mutations applied via "Mutate Type" are undone along with their mappings
Destructive Operation — No Confirmation
Clear All is a destructive operation that takes effect immediately, with no confirmation dialog:
- All mappings are permanently removed the moment you click it
- You must manually recreate or use Auto-Map to re-establish mappings
- Double-check this is your intended action before clicking — there's nothing to confirm or cancel once you do
Clicking Cancel on the Table Mapper afterward will still ask you to confirm discarding the change, since Clear All counts as an unsaved change — but that's your only safety net.
When to Use Clear All
Clear All is appropriate in these scenarios:
- Starting over: You want to completely redesign the mapping strategy
- After bulk import errors: Incorrect mappings were created and it's easier to start fresh
- Testing different approaches: You want to experiment with different mapping configurations
- Before Auto-Map: You want to clear existing mappings before running Auto-Map for a clean slate
- Structural changes: The ASBO structure changed significantly and old mappings are no longer valid
Example Scenario:
You initially mapped columns incorrectly and realized that many attributes are pointing to wrong columns. Rather than removing each mapping individually, you can:
- Click "Clear All"
- Click "Auto-Map" to let BizMetry create correct mappings automatically
- Manually adjust any remaining unmapped or incorrectly mapped attributes
Canceling the Table Mapper
If you close the Table Mapper without saving — via the "Cancel" button, the X button on the toolbar, or the Esc key — BizMetry checks whether you've made any changes since opening it (or since it was last saved, if you're editing existing anchors).
- No changes made: the dialog closes immediately
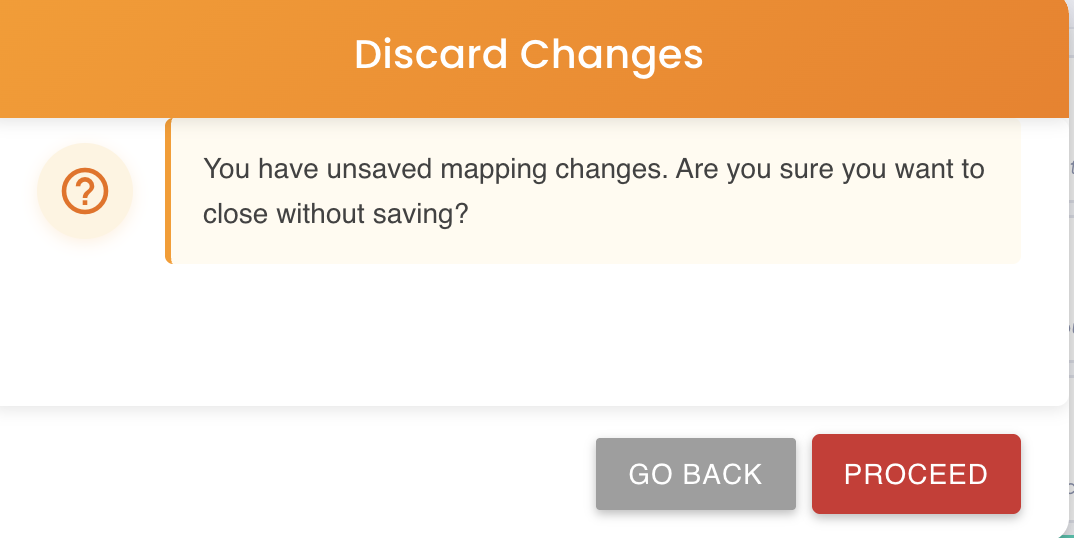
- Changes made: a confirmation dialog appears — "You have unsaved mapping changes. Are you sure you want to close without saving?" — and closing only proceeds if you click "Proceed"; "Go Back" returns you to the Table Mapper with every mapping intact
What counts as a change
Any mapping added, removed, or remapped counts — including a Clear All or an Auto-Map run, both of which modify the mapping set immediately, with no save step of their own. If you use either and then decide to back out, canceling the dialog (and confirming the discard) is how you undo them.
This applies the same way whether you're anchoring a table for the first time or editing an existing anchor's mappings — all three exit paths (Cancel button, X button, Esc) go through the same check, so there's no way to accidentally lose mapping work by pressing the wrong one.
Completing the Anchoring Process
Once you've established all desired column-to-attribute mappings in the Table Mapper, you need to complete the anchoring operation.
Finalizing Mappings
To complete the anchoring:
- Review all mapped attributes to ensure correctness
- Verify that critical attributes (especially those used for RN and RD) are mapped
- Click the "Save" or "Complete Anchoring" button at the bottom of the Table Mapper
- Wait for confirmation that the anchoring was successful
Incomplete Mappings
While BizMetry allows you to save anchoring with some attributes unmapped, be aware that:
- Unmapped attributes cannot be populated during resource imports
- RN and RD configuration requires mapped attributes
- You can always return to the Table Mapper to complete mappings later
Master Environment Mapping Creation
When you complete the anchoring process successfully:
- BizMetry creates the master environment mapping automatically
- This mapping is associated with:
- The selected datasource
- The selected database schema
- The selected table
- The current environment context
- The mapping includes:
- All column-to-attribute associations
- Structural metadata from the table
- Configuration for resource imports
Post-Anchoring State
After successful anchoring:
- The ASBO is now linked to a physical database table
- The "Anchor" button is replaced with "Edit Anchors"
- You can proceed to:
- Configure Resource Name (RN) and Resource Description (RD)
- Set up resource import operations
- Create additional environment mappings for other environments
- Begin importing resources from the anchored table
Anchoring Complete
Your ASBO is now successfully anchored to the database table. You can begin importing resources and managing environment mappings.