Anchoring an ASBO to a Database Table
Overview
Anchoring is the process through which an Application Specific Business Object (ASBO) is linked to a datasource and table, enabling the mapping of physical database columns to the logical attributes of the ASBO.
Anchoring establishes the foundation for resource management by:
- Connecting logical and physical layers: Links abstract business concepts to concrete database structures
- Enabling attribute-level configuration: Allows definition of Resource Name (RN) and Resource Description (RD) at the attribute level
- Facilitating automatic imports: Enables automatic resource importation directly from the anchored table
- Creating environment mappings: Establishes the relationship between business objects and physical data sources
Anchoring vs. Environment Mapping
Anchoring is the initial linking of an ASBO to a table, which creates the master environment mapping. After anchoring, you can create additional environment mappings to link the same ASBO structure to tables in different environments.
Master Environment Mapping
When an ASBO is anchored to a table for the first time, BizMetry automatically creates a master environment mapping. This mapping serves as the source of truth for the ASBO's structure and configuration.
Master Mapping Characteristics
- Automatically created: Generated during the initial anchoring operation
- Associated with origin: Tied to the datasource and environment used during the first anchoring
- Defines structure: Establishes the canonical structure that all other environment mappings must match
- Cannot be edited: The master mapping is immutable to preserve structural integrity
- Can be deleted: Deletion breaks the anchoring relationship
Deleting the Master Environment Mapping
If the master environment mapping is deleted, the anchoring relationship is permanently broken and the ASBO returns to its previous unlinked state.
Consequences of deletion:
- ✗ The ASBO becomes unanchored
- ✗ No further resources can be imported from the database
- ✓ Previously imported resources remain intact
- ✓ The ASBO can be re-anchored to a table (creating a new master mapping)
When to Anchor an ASBO
You should anchor an ASBO in the following scenarios:
Newly Created ASBO
If you manually created an ASBO through the template editor:
- The ASBO exists as a logical definition only
- No connection to physical data exists
- Anchoring links it to a database table
- Resources can then be imported automatically
Imported but Unanchored ASBO
If you imported an ASBO definition from a template file:
- The ASBO has logical structure but no physical mapping
- Anchoring connects it to your database
- Enables resource import and management
Previously Anchored ASBO
If a previously anchored ASBO had its master mapping deleted:
- The ASBO reverted to unanchored state
- Re-anchoring establishes a new master mapping
- New structure definition is created based on the newly selected table
Accessing the Anchor Function
To begin the anchoring process:
- Navigate to the Resource Types tab within the template editing dialog
- Locate the ASBO you wish to anchor
- Click the "Anchor" button for that resource type
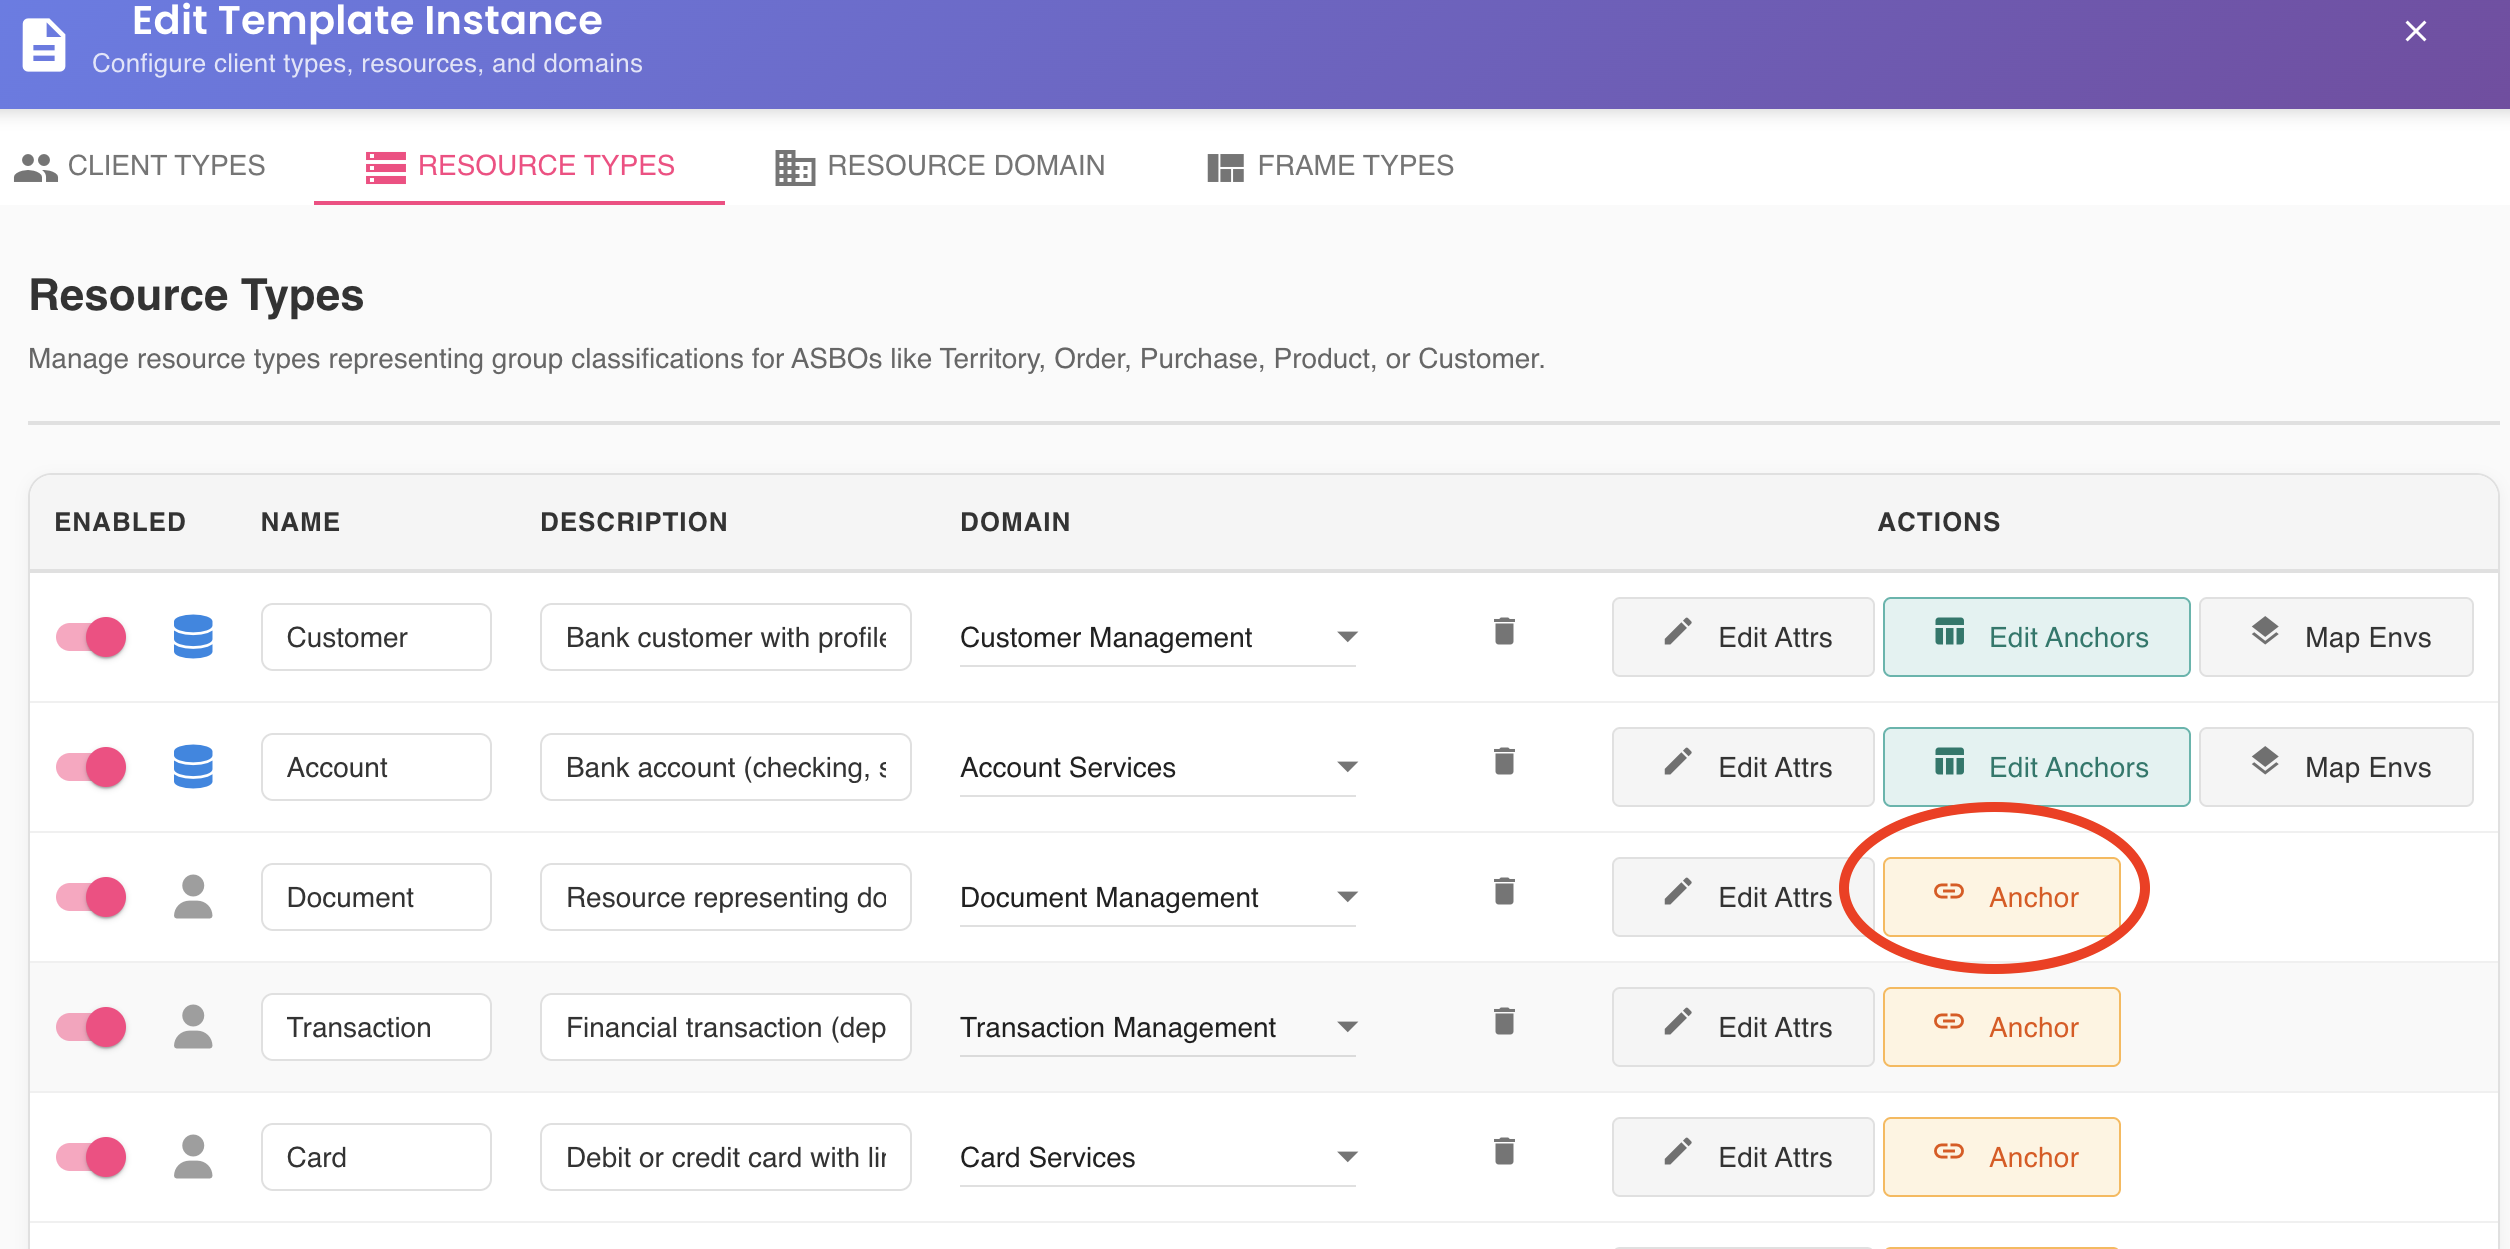
Visual Indicator
Unanchored ASBOs typically display a distinctive icon or badge indicating they are not yet linked to a database table. This helps identify which resource types need anchoring.
Datasource Prerequisites
Before you can anchor an ASBO, certain prerequisites must be met.
Required Datasource Configuration
At least one datasource must be:
- Configured: Properly set up in BizMetry with valid connection parameters
- Active: Enabled and not in a disabled or maintenance state
- Online: Successfully connected to the database server
No Available Datasources
If no datasources meet these requirements, BizMetry displays an error message when you attempt to anchor:
Error Message:
"No active datasources are available. Please configure at least one datasource before anchoring an ASBO."
Resolution:
- Navigate to the datasources configuration section
- Create a new datasource or activate an existing one
- Verify the datasource can connect successfully
- Return to anchor the ASBO
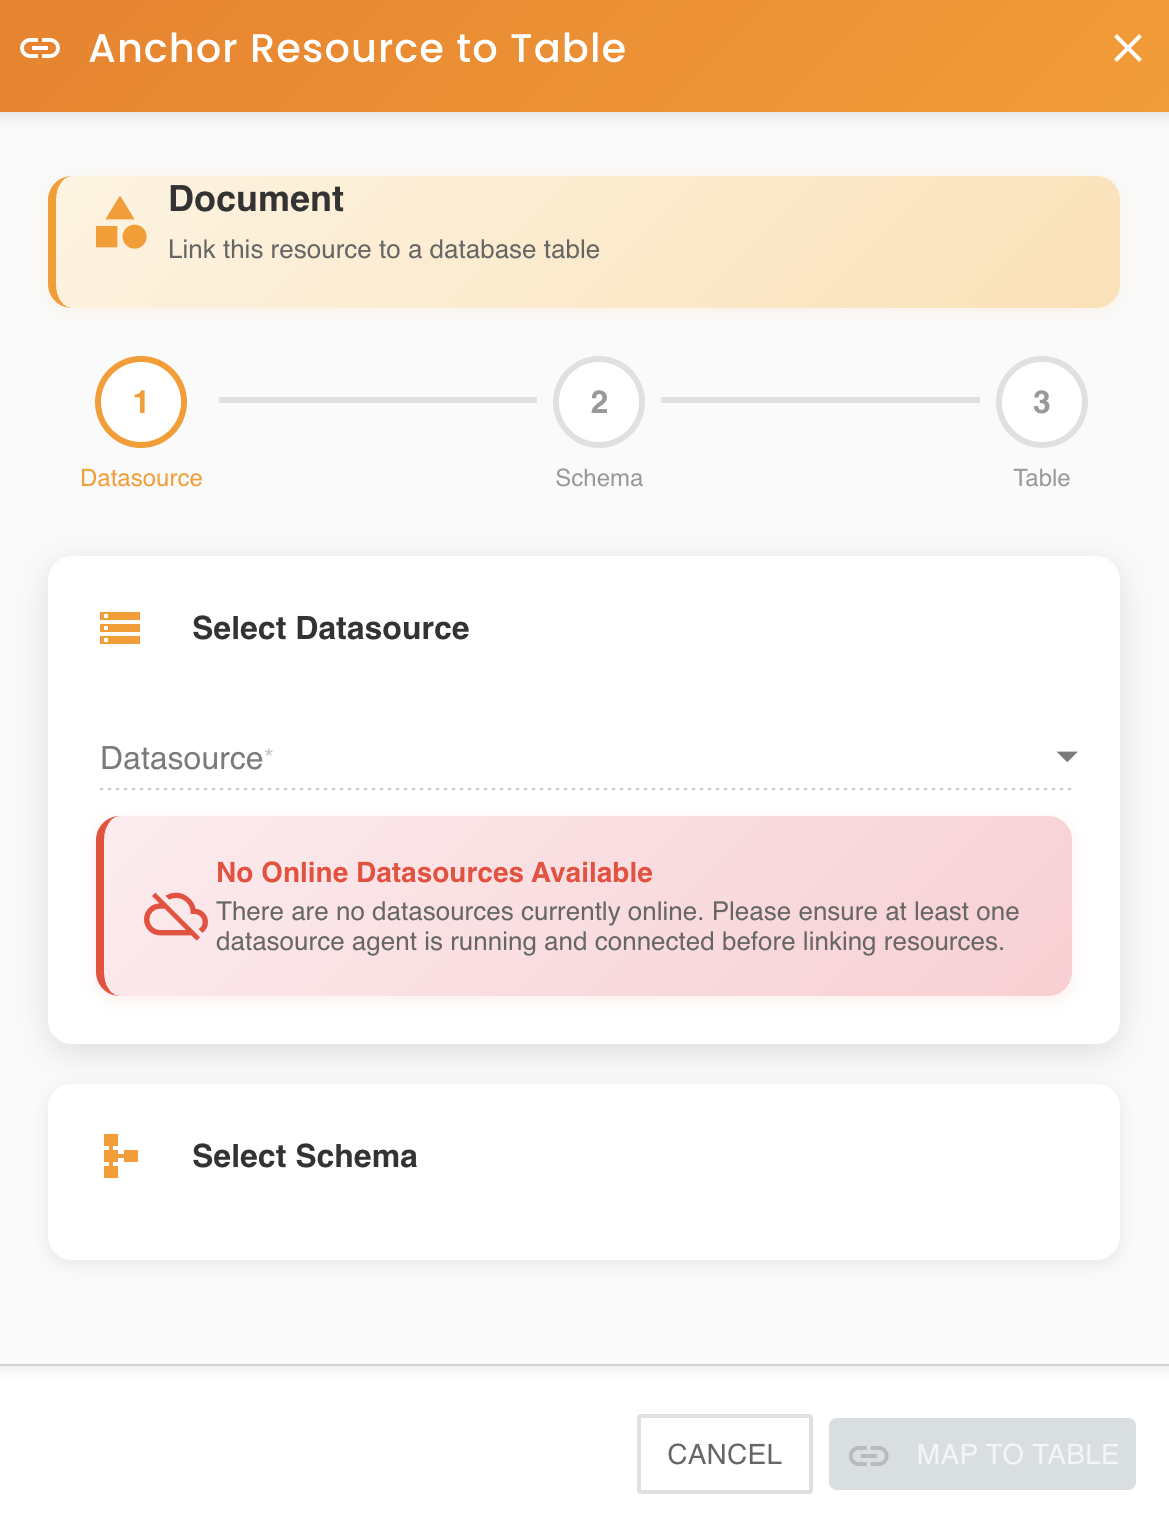
Table Selection Wizard
Once you click the "Anchor" button, the Table Selection Wizard opens, guiding you through the process of selecting the appropriate table.
Wizard Steps
The wizard presents a hierarchical selection interface:
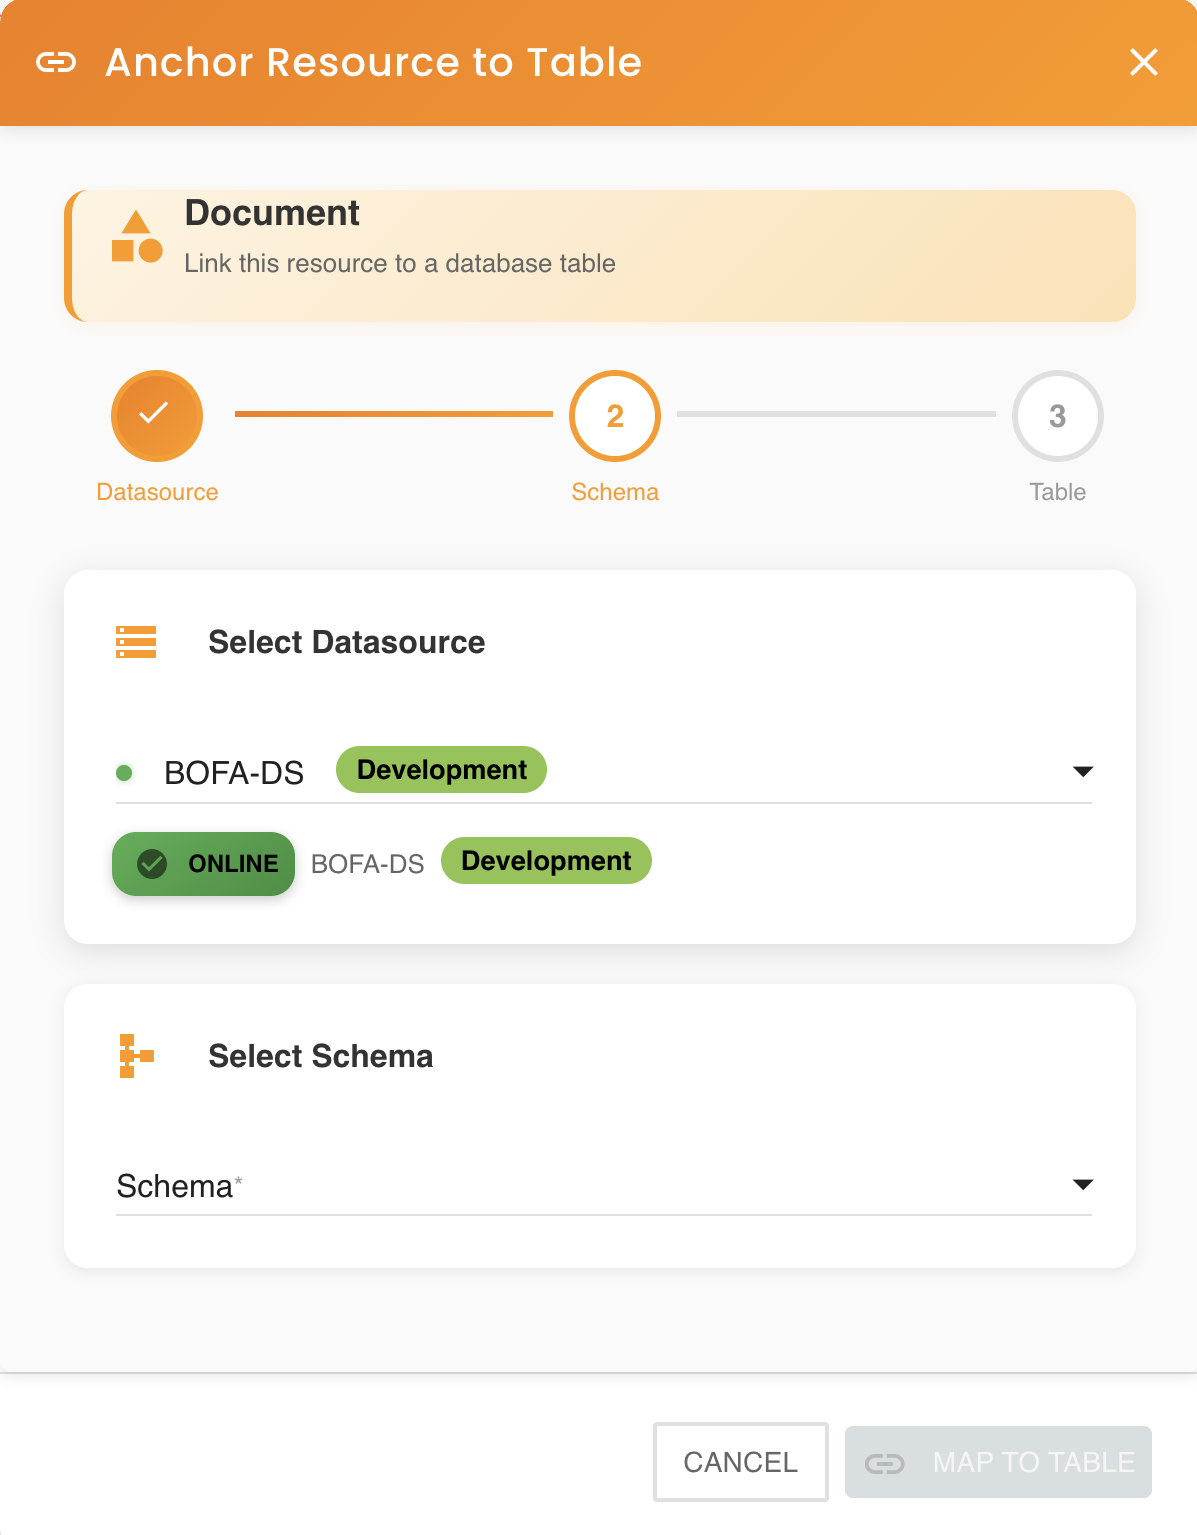
Step 1: Select Datasource
Choose the datasource that contains the target table from the dropdown list.
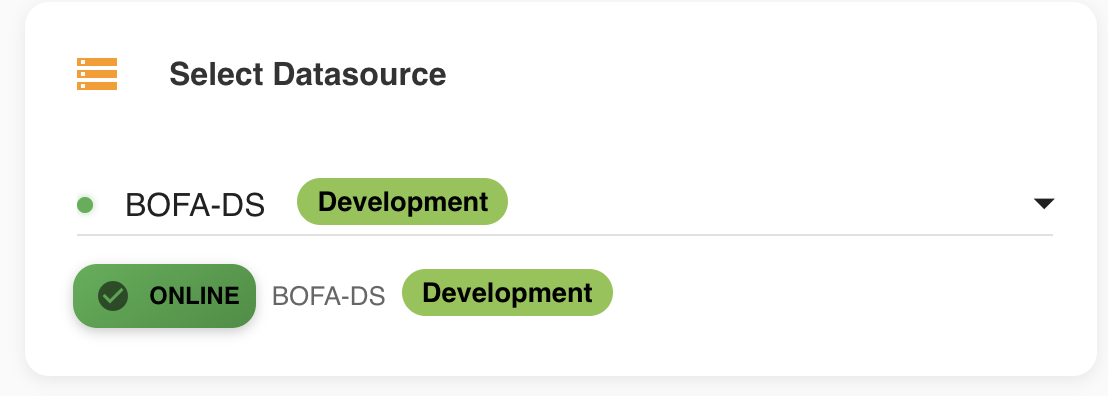
- Available datasources: Only datasources that are active and online appear in this list
- Connection status: BizMetry displays the current connection status for each datasource
- Database type indicator: Icons or labels may indicate the database type (PostgreSQL, MySQL, Oracle, etc.)
Datasource Filtering
The wizard automatically filters out datasources that are inactive, offline, or have connection errors, preventing selection of unavailable resources.
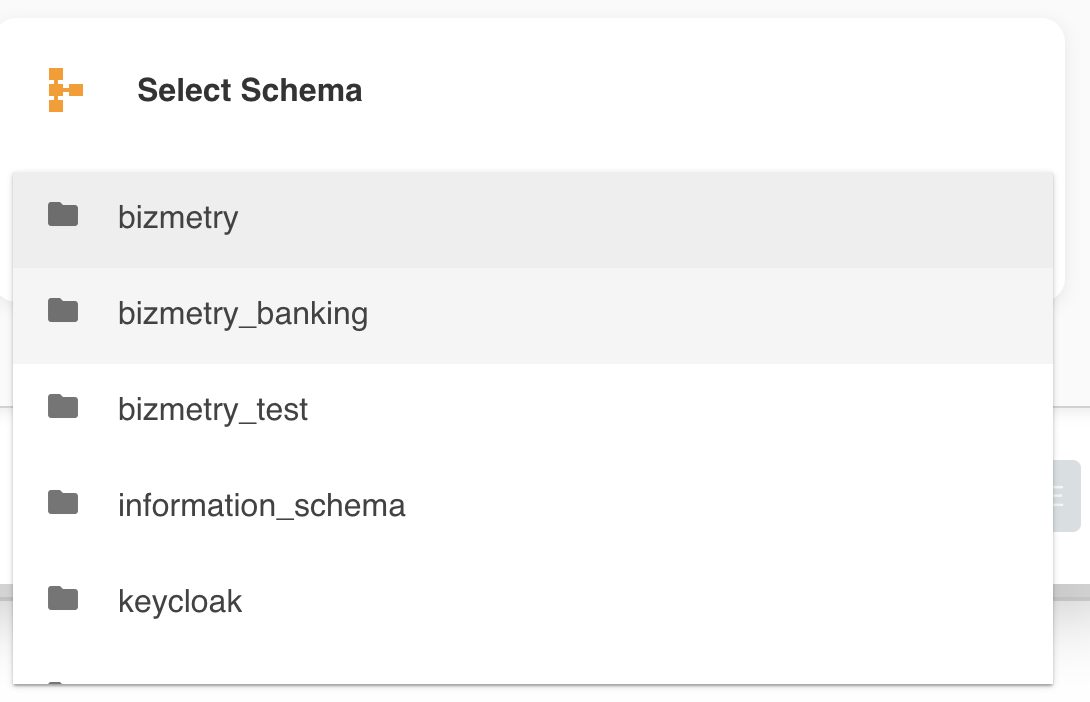
Step 2: Select Schema
After selecting a datasource, choose the database schema where the target table resides.
- Dynamic loading: The schema list is populated based on the selected datasource
- Permission-based: Only schemas you have permission to access are displayed
- Alphabetical ordering: Schemas are typically listed alphabetically for easy navigation
Schema Availability
If you don't see an expected schema in the list:
- Verify the datasource credentials have access to that schema
- Check database-level permissions for the service account
- Confirm the schema actually exists in the selected datasource
Step 3: Select Table
Finally, choose the specific table to anchor to your ASBO.
- Table listing: All tables within the selected schema are displayed
- Metadata preview: Some table information may be shown (row count, size, etc.)
- Search capability: For schemas with many tables, a search function may be available

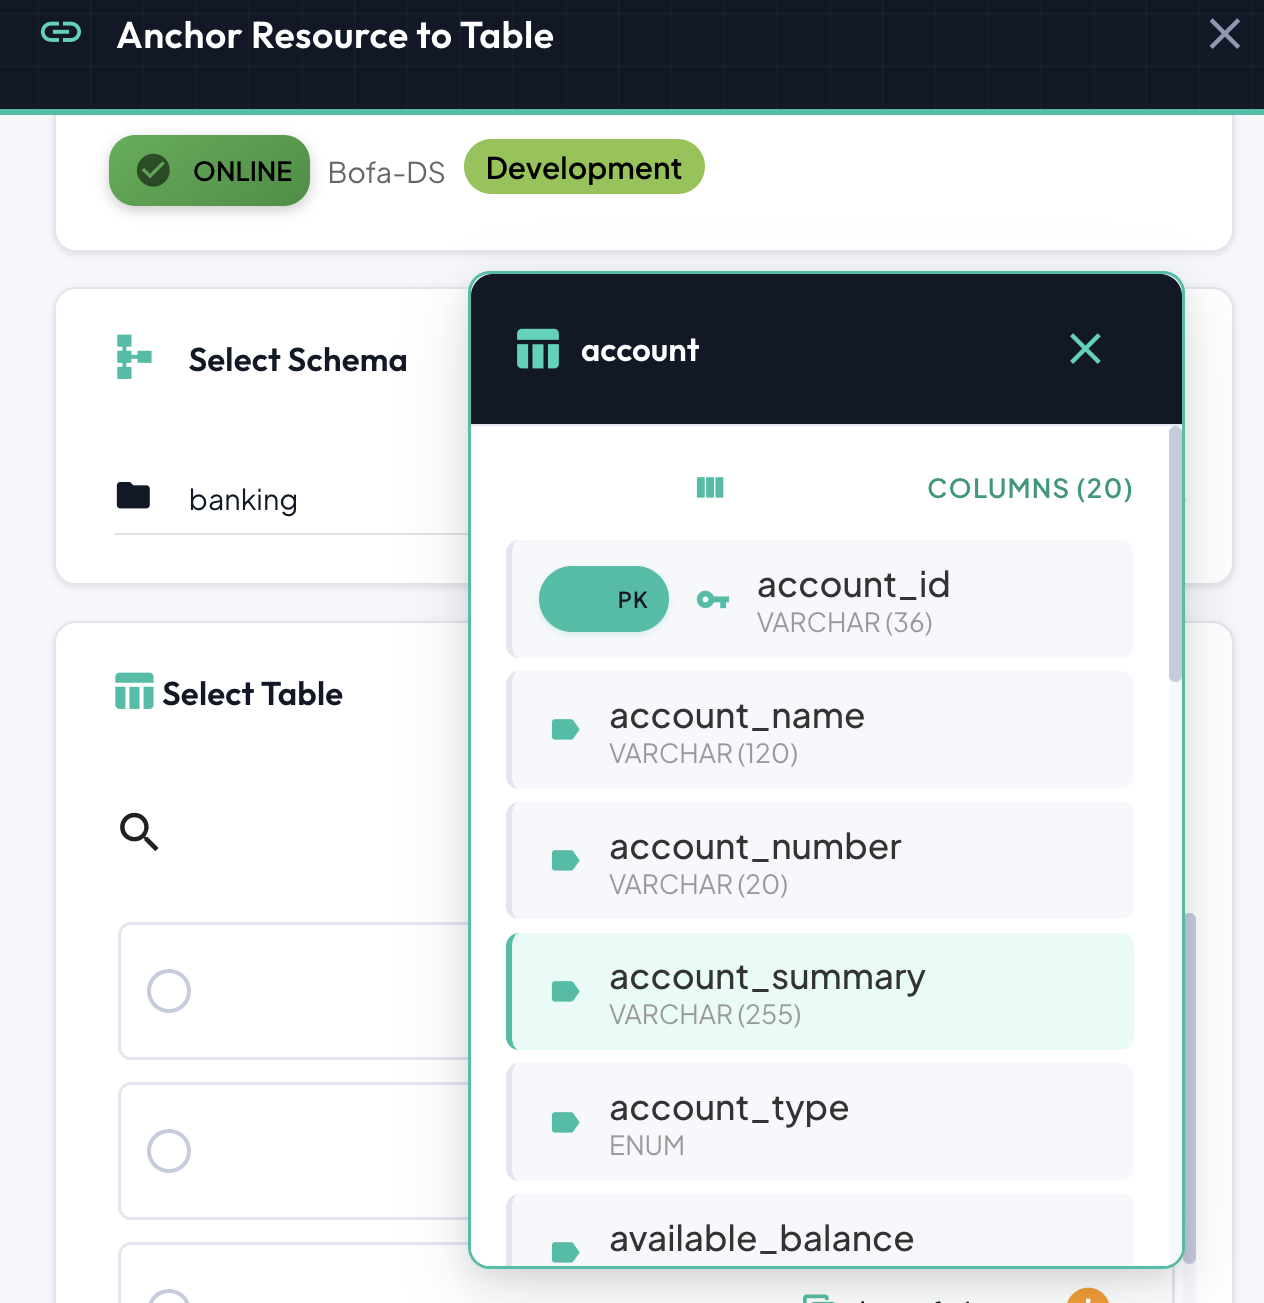
Exploring Table Structure
Before committing to a table selection, you can inspect its structure:
- Click the information icon (i) next to any table in the list
- A schema viewer opens, displaying:
- Column names
- Data types
- Constraints (primary keys, foreign keys, unique constraints)
- Nullable status
- Default values
Pre-Selection Validation
Use the schema viewer to verify the table contains the columns you expect before proceeding. This helps avoid mapping issues later in the process.
Proceeding to Mapping
Once you've selected your target table:
- Review your selections (datasource, schema, table)
- Click the "Map to [table_name]" button
- The Table Mapper tool opens automatically
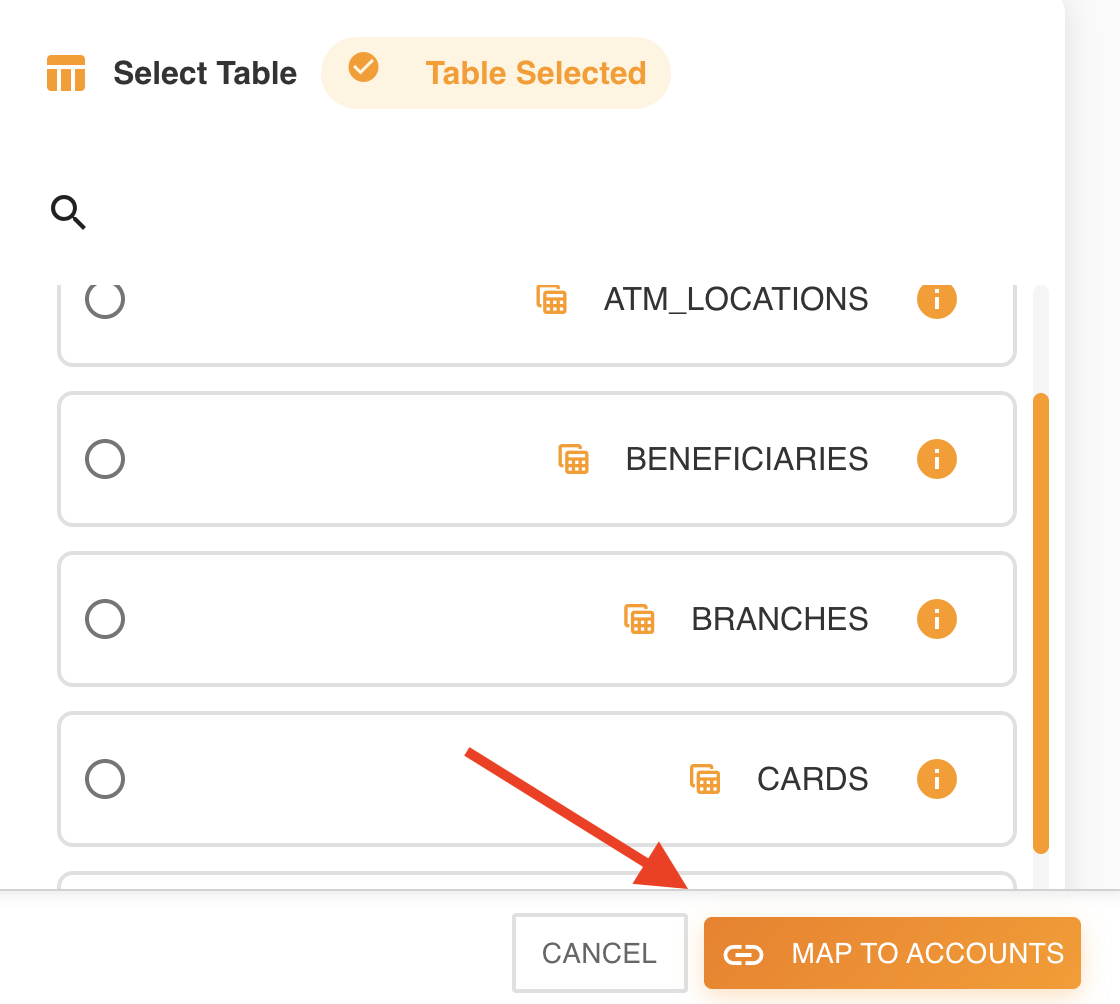
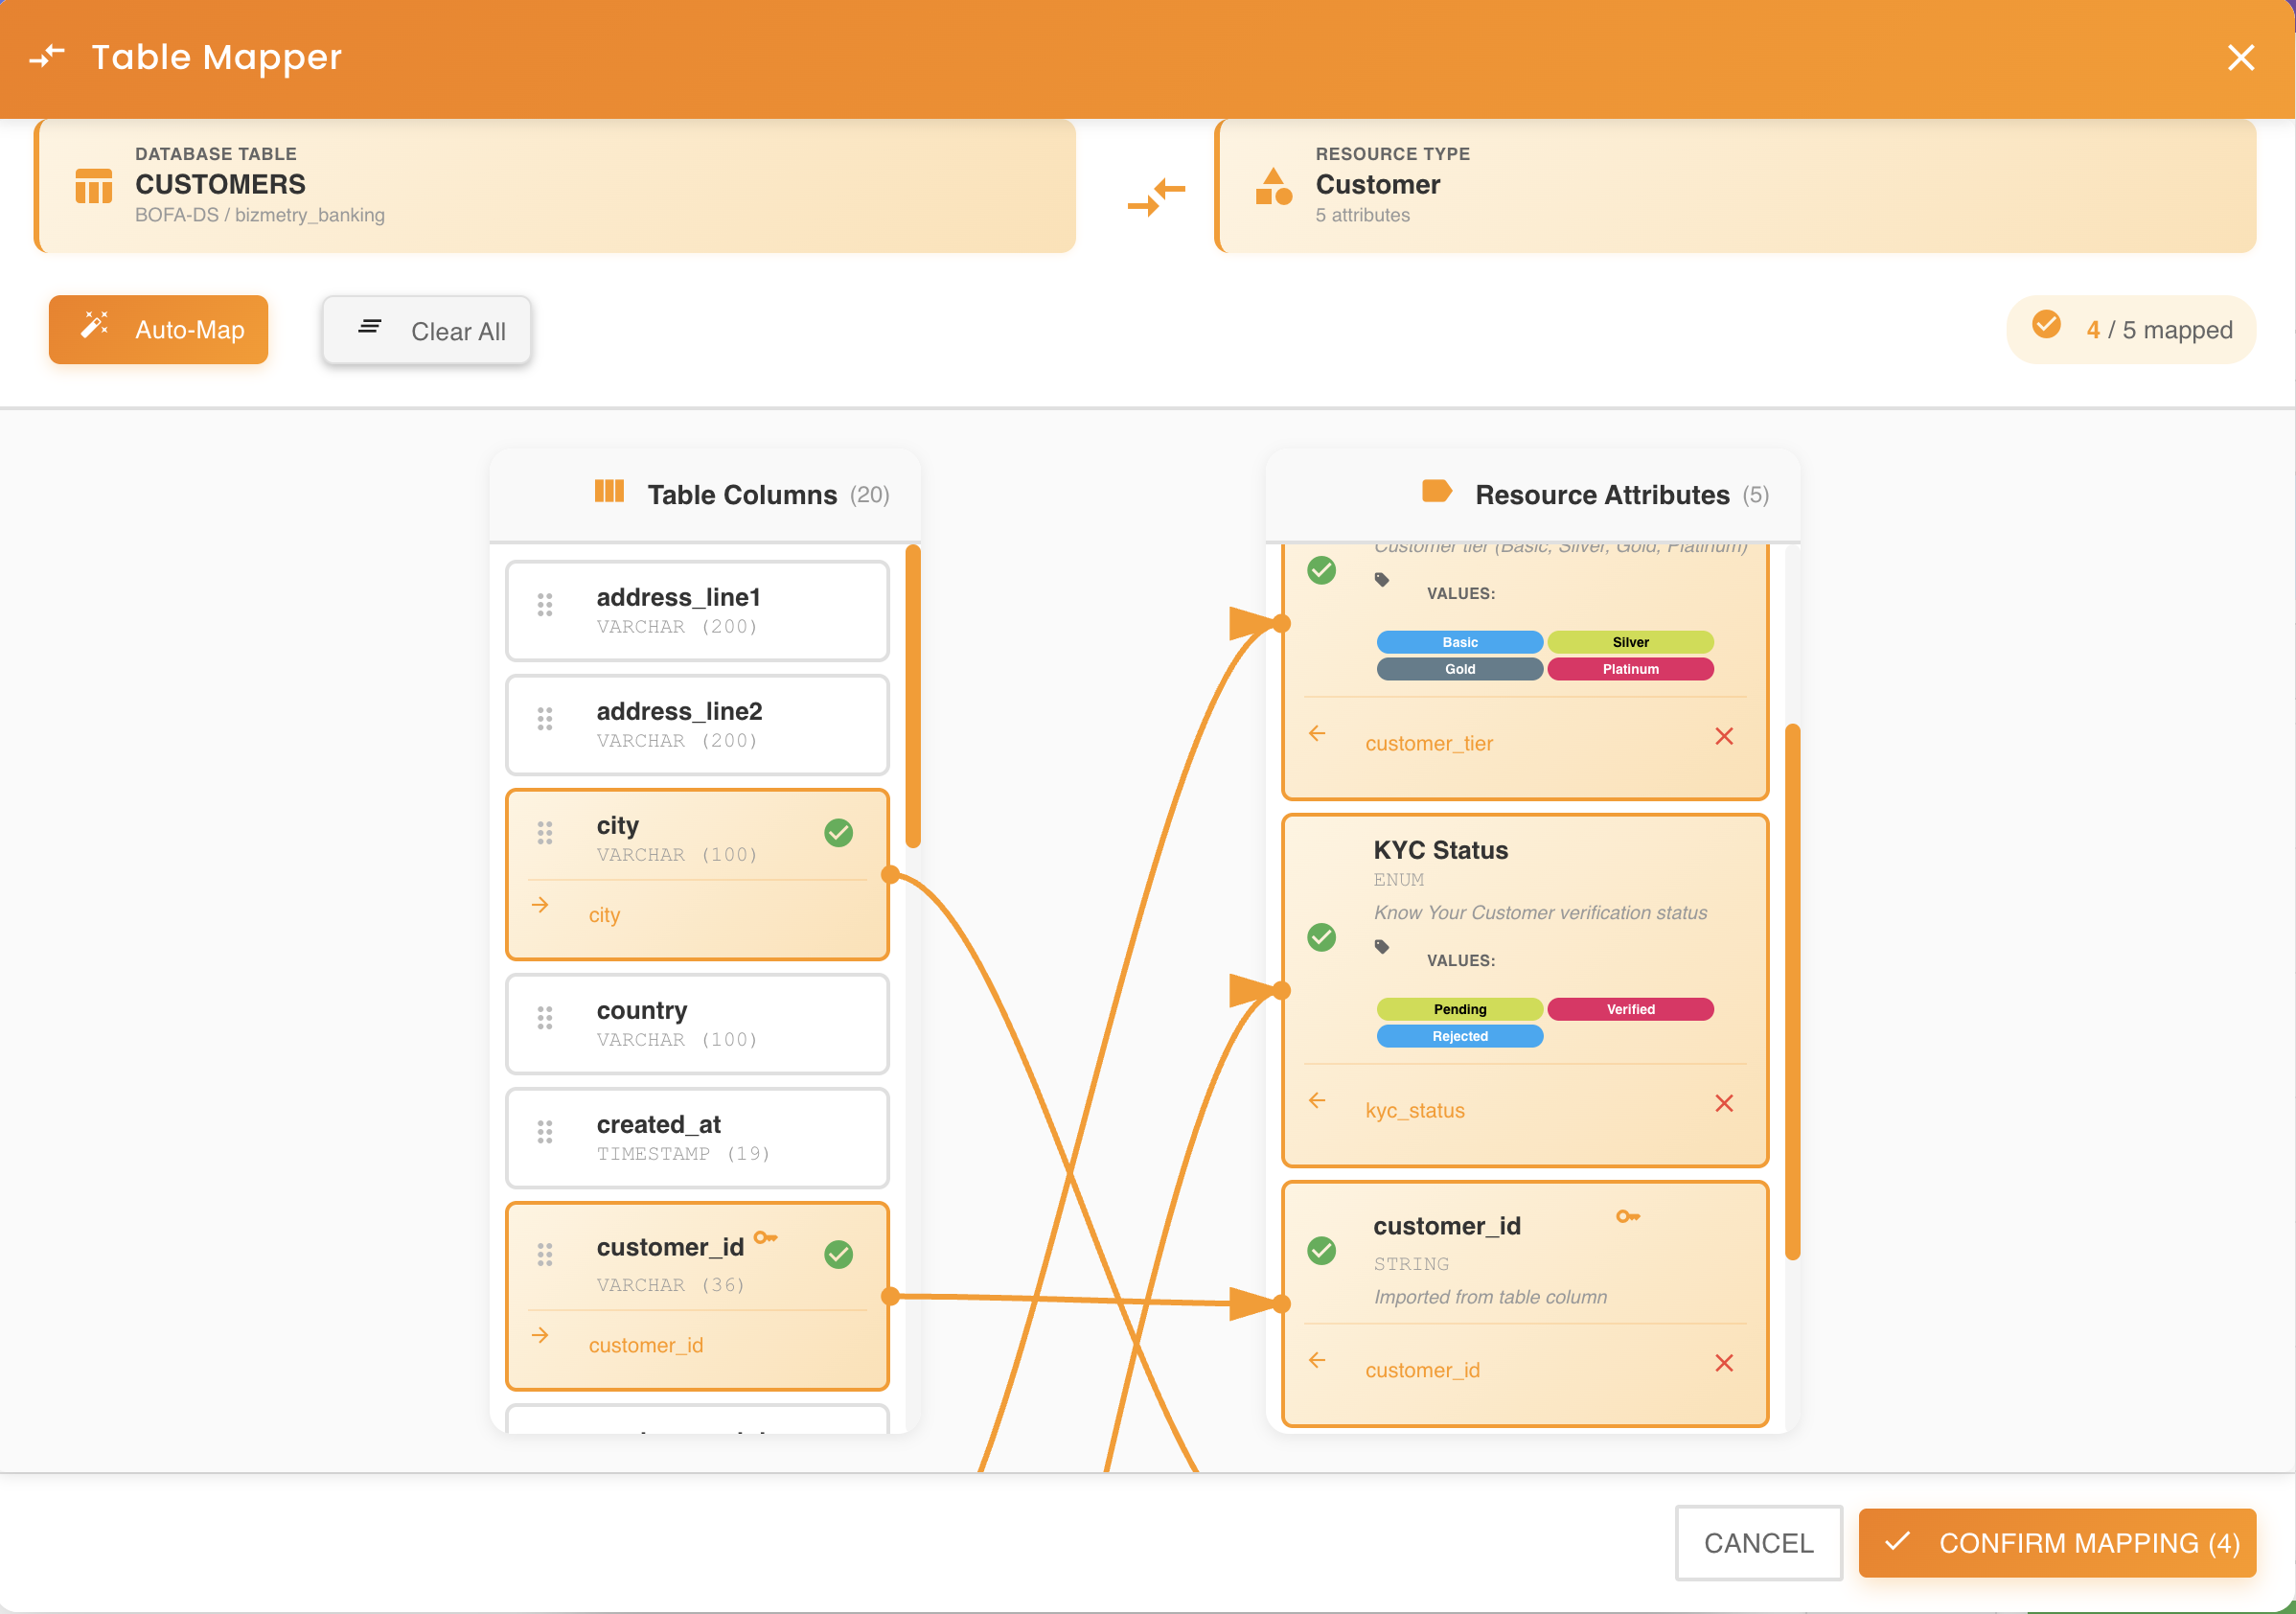
Table Mapper
The Table Mapper is an interactive visual interface where you establish the relationships between database table columns and ASBO logical attributes.
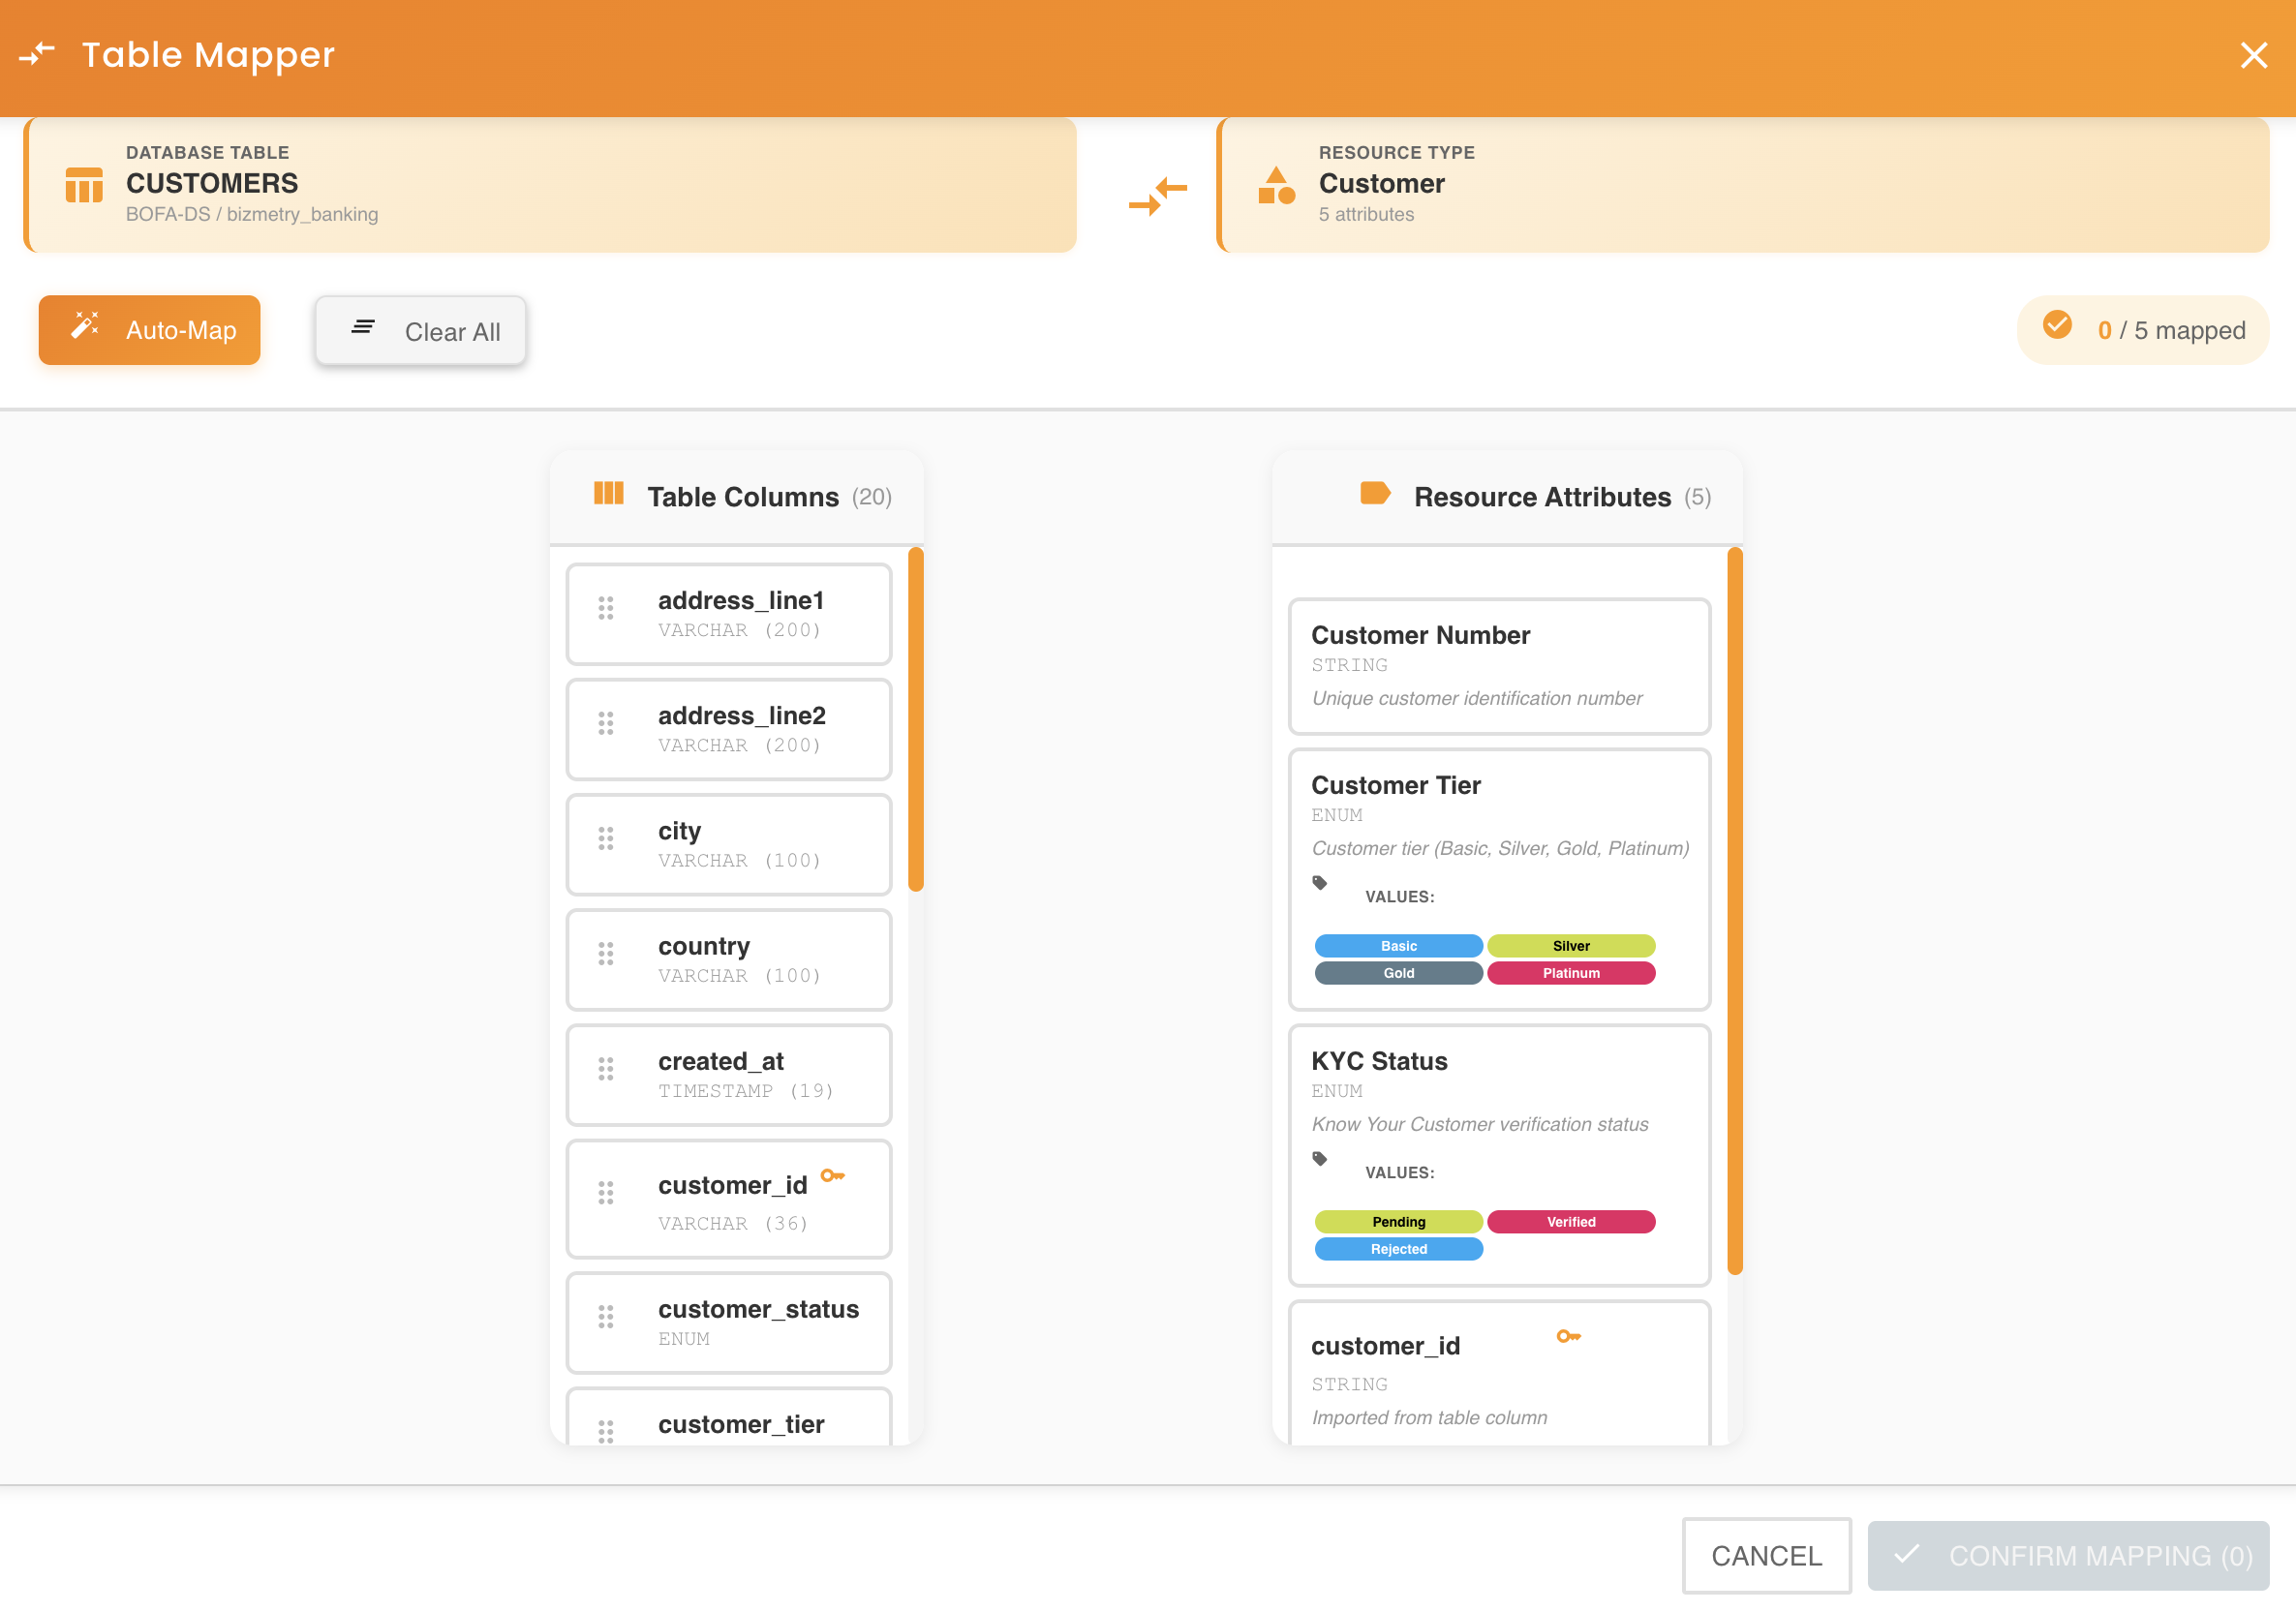
Interface Layout
The Table Mapper uses a two-panel design for intuitive drag-and-drop operations:
Left Panel: Database Columns
Displays all columns detected in the selected database table:
- Column name: The physical column name from the database
- Data type: The database-specific data type (e.g., VARCHAR, INTEGER, TIMESTAMP)
- Constraints: Visual indicators for primary keys, foreign keys, or required fields
- Draggable: Each column can be clicked and dragged to the right panel
Right Panel: ASBO Attributes
Shows the logical attributes defined in the ASBO:
- Attribute name: The logical business attribute name
- Data type: The BizMetry logical data type
- Status: Mapped or unmapped status indicator
- Drop targets: Each attribute serves as a drop target for columns
Visual Feedback
As you drag columns, the interface provides visual feedback:
- Hover states: Potential drop targets are highlighted
- Valid drop zones: Compatible targets show a green indicator
- Invalid drop zones: Incompatible targets show a red indicator or are disabled
Mapping Columns to Attributes
The core functionality of the Table Mapper is establishing column-to-attribute relationships.
Basic Drag and Drop Mapping
To create a mapping between a column and an attribute:
- Click on a column in the left panel
- Drag it across to the right panel
- Hover over the target attribute
- Drop the column onto the attribute
When the drop is successful:
- A visual arrow or connection line appears, linking the column to the attribute
- The attribute card updates to show the mapped column name
- The column in the left panel may become grayed out or marked as "mapped"
Mapping Confirmation
A checkmark or confirmation indicator appears on the attribute to show the mapping is active. The column name is displayed within the attribute card for easy reference.
Data Type Compatibility Validation
When you drag a column onto an attribute, BizMetry automatically validates data type compatibility.
Compatible Types
If the column's database type is compatible with the attribute's logical type:
- The drop is accepted immediately
- The mapping is created without warnings
- No type conversion is needed
Example Compatible Mappings:
| Database Type | Logical Type | Result |
|---|---|---|
| VARCHAR(255) | String | ✓ Compatible |
| INTEGER | Number | ✓ Compatible |
| TIMESTAMP | DateTime | ✓ Compatible |
| BOOLEAN | Boolean | ✓ Compatible |
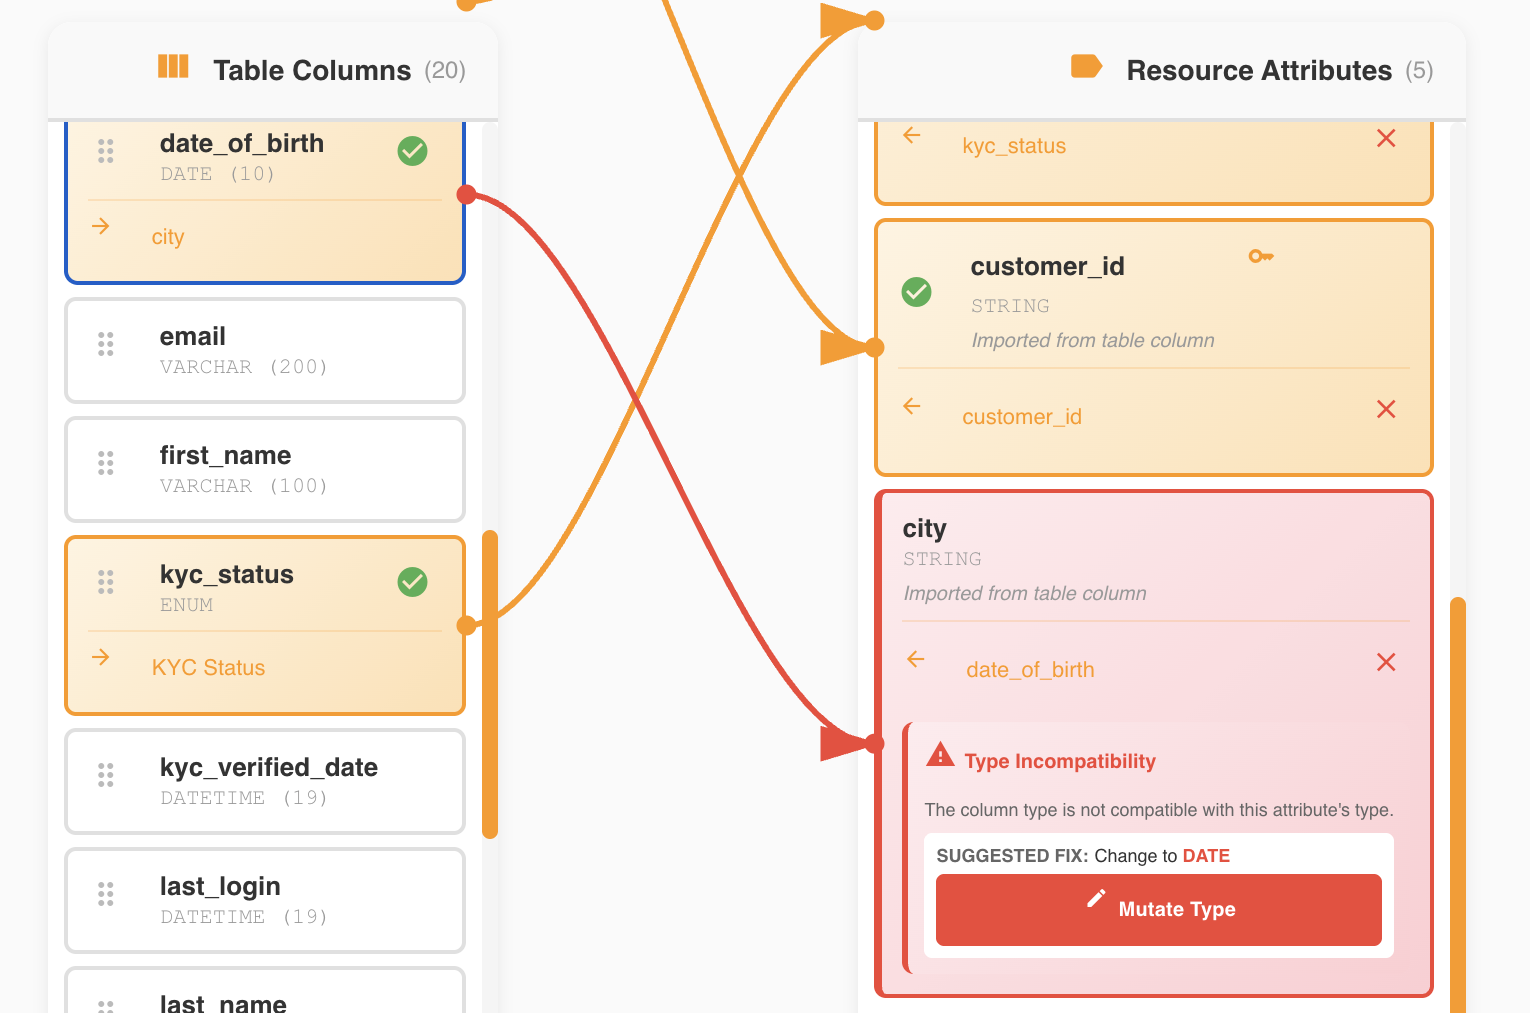
Incompatible Types
If the column's database type is not compatible with the attribute's logical type:
- A warning message appears
- The incompatibility is clearly described
- A suggested type change is recommended
- The mapping is not created until resolved
Example Warning Message:
Data Type Mismatch Detected
The column registration_date (VARCHAR) is incompatible with the attribute RegistrationDate (DateTime).
Suggested action: Change the attribute type to String, or mutate the column type to DateTime.
Click "Mutate Type" to apply the suggested change.
Resolving Type Incompatibilities
BizMetry offers automated resolution for type mismatches:
Option 1: Mutate Attribute Type (Recommended)
Click the "Mutate Type" button to automatically change the attribute's logical type to match the column:
- The attribute type is updated to be compatible with the column
- The mapping is created automatically
- The warning disappears
- The connection is established
When to Mutate
Use the Mutate Type option when:
- The column's type is the correct representation of the data
- You're comfortable changing the logical attribute definition
- Other mappings won't be affected by the type change
Option 2: Select a Different Column
If mutating the type is not appropriate:
- Cancel the current drag operation
- Identify a different column with a compatible type
- Drag the alternative column to the attribute instead
Option 3: Modify Attribute Type Manually
Before mapping:
- Access the attribute definition in the ASBO configuration
- Manually change the attribute's logical type to match the column
- Return to the Table Mapper
- Perform the drag-and-drop operation again
Creating New Attributes from Columns
The Table Mapper allows dynamic creation of new attributes directly from database columns, expanding your ASBO structure as needed.
Drop Zone for New Attributes
To create a new attribute from a column:
- Drag a column from the left panel
- Move it to the top of the right panel (above the first attribute)
- A drop zone appears with a distinctive visual indicator
- Drop the column into this zone
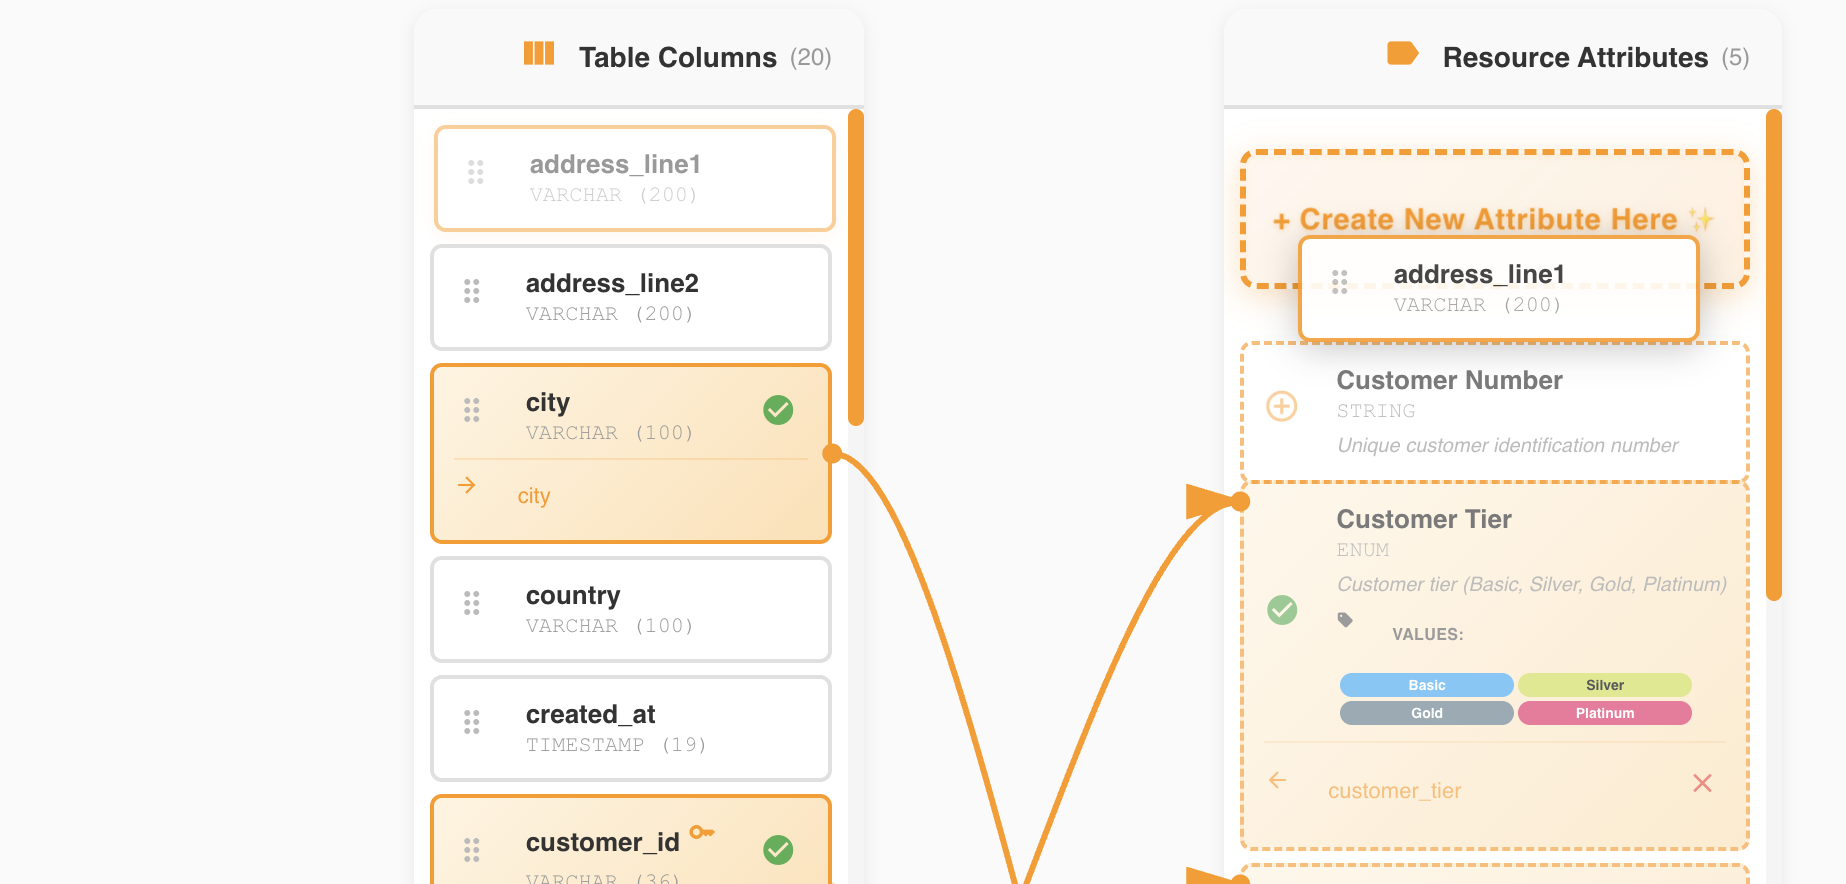
Drop Zone Activation
The drop zone only appears when you drag a column near the top of the attributes list. It provides clear visual feedback that you're in the "create new attribute" area.
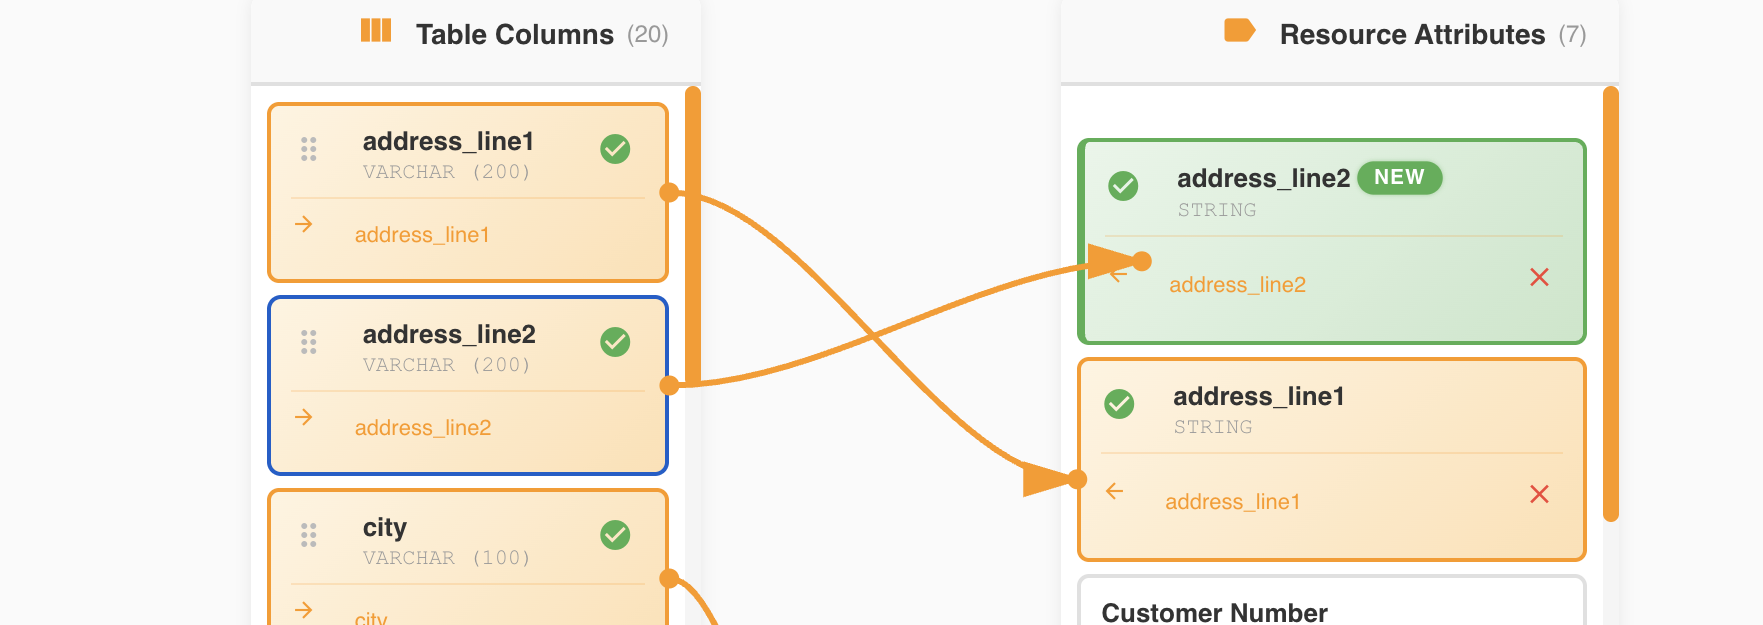
Automatic Attribute Creation
When you drop a column into the new attribute drop zone:
- BizMetry creates a new attribute in the ASBO
- The attribute name matches the column name (or is intelligently transformed)
- The logical data type is automatically set based on the column's database type
- The mapping is established automatically between the new attribute and the column
- The new attribute appears at the top of the attributes list
Automatic Type Mapping Examples:
| Column Type | Auto-Created Attribute Type |
|---|---|
| VARCHAR | String |
| INTEGER / BIGINT | Number |
| DECIMAL / NUMERIC | Decimal |
| DATE / TIMESTAMP | DateTime |
| BOOLEAN / BIT | Boolean |
| TEXT / CLOB | Text |
Instant Integration
The newly created attribute is immediately part of your ASBO definition and can be used for RN/RD configuration, resource imports, and all other ASBO operations.
Naming Conventions
When creating attributes from columns, BizMetry may apply naming transformations:
- Snake case to Pascal case:
client_name→ClientName - Uppercase preservation:
CLIENT_ID→ClientId - Special character removal:
client@email→ClientEmail - Reserved word handling:
select→SelectValue
Customizing Attribute Names
After automatic creation, you can edit the attribute name through the ASBO configuration if the auto-generated name doesn't fit your naming conventions.
Preventing Duplicate Attributes
BizMetry enforces uniqueness of attribute names within an ASBO to maintain data integrity.
Duplicate Detection
When you attempt to create a new attribute from a column:
- BizMetry checks if an attribute with that name already exists
- The check is case-insensitive in most cases
- If a duplicate is detected, the drop operation is blocked
Visual Feedback for Duplicates
When you drag a column whose name matches an existing attribute:
- The drop zone is disabled (grayed out or marked with a prohibition icon)
- A tooltip or message appears explaining the duplicate conflict
- The drop operation cannot be completed
Duplicate Attribute Detected
An attribute named ClientName already exists in this ASBO. You cannot create a duplicate attribute.
Options:
- Map the column to the existing
ClientNameattribute instead - Rename the existing attribute if it represents different data
- Choose a different column to create as a new attribute
Resolution Strategies
If you encounter a duplicate attribute situation:
Strategy 1: Map to Existing Attribute
If the column and existing attribute represent the same data:
- Drag the column to the existing attribute in the list
- Create the mapping to the existing attribute instead
- No new attribute is needed
Strategy 2: Rename Existing Attribute
If the existing attribute should have a different name:
- Exit the Table Mapper
- Edit the ASBO configuration
- Rename the existing attribute to something more specific
- Return to the Table Mapper
- Now create the new attribute from the column
Strategy 3: Use Column Alias
If the database allows, create a view with aliased column names:
CREATE VIEW client_data_v AS
SELECT
    client_name AS client_full_name,
    -- other columns
FROM client_table;
Then anchor to the view instead of the base table.
Removing Attribute Mappings
The Table Mapper allows you to easily remove column-to-attribute associations.
Unmapping a Column
To remove an existing mapping:
- Locate the mapped attribute in the right panel
- Find the "X" button or delete icon within the attribute card
- Click the X button
- The mapping is immediately removed

Effects of Removing a Mapping
When you remove a mapping:
- The visual connection (arrow or line) disappears
- The attribute returns to an unmapped state
- The attribute card no longer displays the column name
- The column in the left panel becomes available again for mapping
- Both the column and attribute return to their pre-mapping state
Non-Destructive Operation
Removing a mapping does not delete the attribute from the ASBO. It simply breaks the connection between the column and the attribute. The attribute remains defined in the ASBO structure.
When to Remove Mappings
Common scenarios for removing mappings:
- Incorrect mapping: You mapped the wrong column to an attribute
- Type mismatch: After reviewing, you realize the types don't align semantically
- Structural changes: The ASBO structure needs to be reorganized
- Column deprecation: The database column is being phased out
Re-mapping After Removal
After removing a mapping, you can:
- Map a different column to the same attribute
- Leave the attribute unmapped temporarily
- Delete the attribute entirely if no longer needed
- Re-map the same column after making changes
Completing the Anchoring Process
Once you've established all desired column-to-attribute mappings in the Table Mapper, you need to complete the anchoring operation.
Finalizing Mappings
To complete the anchoring:
- Review all mapped attributes to ensure correctness
- Verify that critical attributes (especially those used for RN and RD) are mapped
- Click the "Save" or "Complete Anchoring" button at the bottom of the Table Mapper
- Wait for confirmation that the anchoring was successful
Incomplete Mappings
While BizMetry allows you to save anchoring with some attributes unmapped, be aware that:
- Unmapped attributes cannot be populated during resource imports
- RN and RD configuration requires mapped attributes
- You can always return to the Table Mapper to complete mappings later
Master Environment Mapping Creation
When you complete the anchoring process successfully:
- BizMetry creates the master environment mapping automatically
- This mapping is associated with:
- The selected datasource
- The selected database schema
- The selected table
- The current environment context
- The mapping includes:
- All column-to-attribute associations
- Structural metadata from the table
- Configuration for resource imports
Post-Anchoring State
After successful anchoring:
- The ASBO is now linked to a physical database table
- The "Anchor" button is replaced with "Edit Anchors"
- You can proceed to:
- Configure Resource Name (RN) and Resource Description (RD)
- Set up resource import operations
- Create additional environment mappings for other environments
- Begin importing resources from the anchored table
Anchoring Complete
Your ASBO is now successfully anchored to the database table. You can begin importing resources and managing environment mappings.
Mapping Automation Features
The Table Mapper provides automation tools to streamline the mapping process, especially useful when working with tables that have many columns or when starting fresh.
Auto-Map Feature
The Auto-Map button enables BizMetry to automatically infer mappings between columns and attributes based on their names and data types.

How Auto-Map Works
When you click the "Auto-Map" button:
- BizMetry analyzes all unmapped columns in the left panel
- Compares column names and types against unmapped attributes
- Identifies the best matches based on:
- Name similarity: Exact matches, case-insensitive matches, or close approximations
- Type compatibility: Ensures database types are compatible with logical types
- Naming conventions: Recognizes common transformations (e.g., snake_case to PascalCase)
- Creates mappings automatically for all identified matches
- Displays the results with visual indicators for newly created mappings
Incremental Mapping
Auto-Map is non-destructive and incremental:
- Existing mappings are preserved: Already mapped attributes remain unchanged
- Only adds new mappings: Auto-Map only creates mappings for unmapped attributes
- Can be run multiple times: Safe to use repeatedly without losing manual mappings
When to Use Auto-Map
Auto-Map is particularly useful in these scenarios:
- Initial anchoring: When mapping an ASBO to a table for the first time
- Column-to-attribute alignment: When column names closely match attribute names
- Large tables: When dealing with tables that have many columns
- Standardized schemas: When database naming conventions align with ASBO conventions
- Time savings: When you want to quickly establish a baseline mapping
Example Scenario:
You have an ASBO with attributes named ClientId, ClientName, Email, and CreatedDate. The database table has columns named client_id, client_name, email, and created_date.
Clicking Auto-Map will: - Map client_id → ClientId - Map client_name → ClientName - Map email → Email - Map created_date → CreatedDate
All mappings are created automatically in seconds.
Auto-Map Matching Rules
BizMetry uses the following rules to determine matches:
Exact Match (Highest Priority): - Column name exactly matches attribute name (case-insensitive) - Example: ClientId (attribute) matches clientid (column)
Transformed Match: - Column name matches after applying naming convention transformations - Example: client_name (column) matches ClientName (attribute) - Example: CLIENT_ID (column) matches ClientId (attribute)
Partial Match (Lower Priority): - Column name contains or is contained in attribute name - Example: client_email_address (column) might match ClientEmail (attribute)
Type Validation: - All matches must have compatible data types - Incompatible types are skipped even if names match
Review Auto-Mapped Results
After using Auto-Map:
- Review all newly created mappings
- Verify that semantic meaning aligns (not just names)
- Adjust or remove any incorrect automatic mappings
- Manually map any remaining unmapped attributes
Auto-Map Limitations
Auto-Map may not create mappings in these situations:
- No name similarity: Column and attribute names are completely different
- Type incompatibility: Column type cannot be converted to attribute type
- Already mapped: The attribute already has a mapping from previous operations
- Ambiguous matches: Multiple columns could match the same attribute
In these cases, manual mapping is required.
Clear All Mappings
The "Clear All" button removes all existing column-to-attribute mappings, allowing you to start the mapping process from scratch.
How Clear All Works
When you click the "Clear All" button:
- A confirmation dialog appears to prevent accidental deletion
- If confirmed, BizMetry removes all mappings between columns and attributes
- All attributes return to an unmapped state
- All columns become available again for mapping
- Visual connections (arrows/lines) are removed from the interface
Destructive Operation
Clear All is a destructive operation that cannot be easily undone:
- All mappings are permanently removed
- You must manually recreate or use Auto-Map to re-establish mappings
- Always confirm this is your intended action before proceeding
When to Use Clear All
Clear All is appropriate in these scenarios:
- Starting over: You want to completely redesign the mapping strategy
- After bulk import errors: Incorrect mappings were created and it's easier to start fresh
- Testing different approaches: You want to experiment with different mapping configurations
- Before Auto-Map: You want to clear existing mappings before running Auto-Map for a clean slate
- Structural changes: The ASBO structure changed significantly and old mappings are no longer valid
Example Scenario:
You initially mapped columns incorrectly and realized that many attributes are pointing to wrong columns. Rather than removing each mapping individually, you can:
- Click "Clear All"
- Click "Auto-Map" to let BizMetry create correct mappings automatically
- Manually adjust any remaining unmapped or incorrectly mapped attributes
Best Practices for Anchoring
Pre-Anchoring Planning
Before beginning the anchoring process:
Understand Your Data Model
- ✓ Review the database table structure thoroughly
- ✓ Understand the meaning and purpose of each column
- ✓ Identify primary keys and required columns
- ✓ Document any business rules or constraints
Plan Your ASBO Structure
- ✓ Decide which columns should map to which attributes
- ✓ Determine appropriate logical data types
- ✓ Identify which attributes will serve as RN and RD
- ✓ Consider future scalability and additional environments
Verify Prerequisites
- ✓ Ensure datasource connectivity is stable
- ✓ Confirm you have appropriate database permissions
- ✓ Test datasource connection before anchoring
- ✓ Verify the target table contains actual data (if possible)
During Anchoring
Systematic Mapping Approach
- ✓ Map critical attributes first (primary key, RN, RD candidates)
- ✓ Review each type incompatibility warning carefully
- ✓ Use meaningful attribute names if creating new attributes
- ✓ Document any type mutations or transformations applied
Validation and Review
- ✓ Double-check all mappings before saving
- ✓ Verify that required business attributes are mapped
- ✓ Ensure data types make logical sense for the use case
- ✓ Test drag-and-drop operations before committing
Post-Anchoring Actions
Immediate Follow-up
- ✓ Configure RN and RD for the anchored ASBO
- ✓ Perform a test import of a small number of resources
- ✓ Verify imported data matches expectations
- ✓ Review and validate the master environment mapping
Documentation
- ✓ Document the anchoring decision and rationale
- ✓ Record which datasource/schema/table was selected
- ✓ Note any special mappings or type mutations
- ✓ Update team documentation and knowledge base
Testing and Validation
- ✓ Import a sample set of resources
- ✓ Verify all mapped attributes are populated correctly
- ✓ Test RN and RD rendering
- ✓ Validate data integrity and completeness
Common Anchoring Scenarios
Scenario 1: Anchoring a New ASBO to an Existing Table
Situation: You manually created an ASBO and need to link it to an existing database table.
Steps:
- Click the "Anchor" button on the newly created ASBO
- Select the appropriate datasource, schema, and table
- Review the table structure using the schema viewer
- Open the Table Mapper
- Systematically map each ASBO attribute to the corresponding table column
- Address any type incompatibilities using the Mutate Type feature
- Verify all critical attributes are mapped (especially RN and RD)
- Save the anchoring configuration
- Test import a small set of resources to validate the mappings
Outcome: The ASBO is now anchored and ready for resource imports.
Scenario 2: Re-anchoring After Master Mapping Deletion
Situation: A master environment mapping was deleted, and the ASBO needs to be re-anchored.
Steps:
- Verify that the ASBO shows as "unanchored" in the interface
- Click the "Anchor" button (which becomes available again)
- Select a datasource, schema, and table
- In the Table Mapper, map columns to attributes
- Note that you're creating a new master mapping with a potentially different structure
- Complete the anchoring process
- Consider re-importing existing resources to align with the new structure
Outcome: A new master environment mapping is created, and the ASBO is anchored again.
Structure May Change
When re-anchoring, the new table's structure defines the ASBO structure going forward. This may differ from the previous anchoring, potentially causing incompatibilities with existing environment mappings or resources.
Scenario 3: Anchoring to a Database View
Situation: You need to anchor an ASBO to a database view rather than a base table.
Steps:
- Ensure the database view exists and is accessible via the datasource
- Click "Anchor" on the ASBO
- Select the datasource and schema containing the view
- In the table selection list, locate and select the view (views are typically marked with a special icon)
- Review the view's column structure using the schema viewer
- Open the Table Mapper and establish column-to-attribute mappings
- Complete the anchoring process
Outcome: The ASBO is anchored to the view, and resource imports will execute queries against the view definition.
Benefits of Views
Anchoring to views provides flexibility:
- Transform data: Apply business logic at the database level
- Hide complexity: Abstract complex joins or calculations
- Column renaming: Alias columns to match expected attribute names
- Filtering: Pre-filter data that should be imported
Scenario 4: Anchoring with Minimal Attribute Set
Situation: You want to anchor an ASBO but only map a subset of available columns.
Steps:
- Begin the anchoring process as normal
- In the Table Mapper, map only the essential columns:
- Primary key column
- Columns for RN and RD
- Critical business attributes
- Leave other attributes unmapped for now
- Save the anchoring configuration
- Test import resources to verify the minimal mapping works
- Return later to add additional mappings as needed
Outcome: The ASBO is anchored with minimal mappings, allowing for incremental configuration.
Iterative Approach
You don't need to map all attributes during initial anchoring. Start with essentials and expand the mapping over time as requirements evolve.
Scenario 5: Anchoring with Type Transformations
Situation: Database column types don't match your desired logical types, requiring transformations.
Steps:
- Begin the anchoring process and open the Table Mapper
- Drag a column to an attribute and encounter a type incompatibility warning
- Review the suggested type change carefully
- If acceptable, click "Mutate Type" to apply the transformation
- If not acceptable, consider:
- Creating a database view with
CASTorCONVERToperations - Modifying the ASBO attribute type manually before mapping
- Using a different column that has the correct type
- Repeat for each column requiring type handling
- Complete the anchoring process after all transformations are resolved
Outcome: The ASBO is anchored with appropriate type mappings, either through mutations or database-level transformations.
Type Transformation Considerations
When using type mutations:
- Ensure the transformation makes semantic sense
- Verify that data can be safely converted (e.g., VARCHAR to DateTime requires proper format)
- Test thoroughly with actual data to catch conversion errors
- Document transformations for future maintainers
Troubleshooting Anchoring Issues
No Datasources Available
Symptoms: - Error message appears when clicking "Anchor" - "No active datasources" warning displayed - Cannot proceed to table selection
Resolution:
- Navigate to the Datasources configuration section
- Verify at least one datasource exists
- Check that the datasource status is "Active" and "Online"
- Test datasource connectivity:
- Click "Test Connection" if available
- Review connection parameters (host, port, database name)
- Verify credentials are correct and not expired
- If no datasources exist, create a new one:
- Provide connection details
- Test the connection
- Activate the datasource
- Return to the ASBO and retry anchoring
Schema or Table Lists Empty
Symptoms: - Datasource is selected but no schemas appear - Schema is selected but no tables appear - Dropdown lists show "No items found"
Resolution:
- Verify permissions:
- Ensure the datasource credentials have
SELECTpermission on information schema - Check that the database user can enumerate schemas and tables
-
Verify no database-level restrictions on metadata access
-
Check datasource configuration:
- Confirm the datasource is pointing to the correct database server
- Verify the default schema or database is set correctly
-
Review any schema filtering or exclusion rules in the datasource settings
-
Test database access directly:
-- Test schema access SELECT schema_name FROM information_schema.schemata; -- Test table access SELECT table_name FROM information_schema.tables WHERE table_schema = 'your_schema'; -
Refresh the datasource:
- Navigate to datasource configuration
- Click "Refresh Metadata" or "Reconnect"
- Return to anchoring wizard and retry
Type Incompatibility Cannot Be Resolved
Symptoms: - Repeated type mismatch warnings - Mutate Type doesn't produce the desired result - No compatible columns available for an attribute
Resolution:
- Understand the root cause:
- Review the column's actual data type in the database
- Determine if the data can be safely converted to the desired logical type
-
Check if sample data matches the expected format
-
Database-level solutions:
-- Create a view with type conversions CREATE VIEW compatible_table_v AS SELECT CAST(varchar_column AS INTEGER) AS numeric_attribute, TO_DATE(string_date, 'YYYY-MM-DD') AS date_attribute, CAST(bit_column AS BOOLEAN) AS boolean_attribute FROM source_table; -
ASBO-level solutions:
- Modify the ASBO attribute type to match the column type
- Add a transformation step in your data pipeline
-
Use middleware or ETL to pre-process data before import
-
Alternative approaches:
- Map to a different column that has compatible type
- Store the raw value and transform at the application level
- Create a computed column in the database with the correct type
Drag and Drop Not Working
Symptoms: - Columns cannot be dragged - Drop zones don't activate - No visual feedback during drag operations
Resolution:
- Browser issues:
- Refresh the browser page
- Clear browser cache and cookies
- Try a different browser (Chrome, Firefox, Edge recommended)
-
Disable browser extensions that might interfere with drag-and-drop
-
UI state issues:
- Close and reopen the Table Mapper
- Exit the anchoring wizard and start again
-
Log out and log back in to BizMetry
-
Data loading issues:
- Ensure the table structure has fully loaded (watch for loading indicators)
- Wait a few seconds after the interface opens before attempting drag operations
-
Check browser console for JavaScript errors
-
Alternative mapping method:
- If drag-and-drop continues to fail, check if there's a manual mapping option
- Some interfaces may provide dropdown-based mapping as an alternative
Anchoring Saves But Resources Won't Import
Symptoms: - Anchoring completes successfully - Import operations fail or return no data - Error messages about missing columns or invalid mappings
Resolution:
- Verify the master environment mapping:
- Navigate to Env Mappings for the ASBO
- Confirm the master mapping was created
-
Check that it points to the correct datasource/schema/table
-
Check attribute mappings:
- Review each attribute in the ASBO configuration
- Verify the
column_metadata_namefield is populated correctly -
Ensure critical attributes (especially primary key) are mapped
-
Test datasource connectivity from import context:
- The import process may use different credentials or connection pooling
- Verify the agent or import service can reach the database
-
Check firewall rules and network connectivity
-
Review import logs:
- Check detailed error messages in the import logs
- Look for SQL errors, connection timeouts, or permission denials
-
Identify which specific column or query is failing
-
Validate data compatibility:
- Query the table directly to ensure data exists
- Check that data values are compatible with mapped types
- Verify primary key values are unique and not null
Duplicate Attribute Names Causing Issues
Symptoms: - Cannot create new attributes from columns - Drop zone is always disabled - Error about attribute name conflicts
Resolution:
- Identify the conflict:
- Review all existing ASBO attributes
- Note which attribute name matches the column name
-
Determine if they should represent the same or different data
-
If they represent the same data:
- Map the column to the existing attribute instead of creating new
-
Verify the existing attribute has the correct type
-
If they represent different data:
- Rename the existing attribute to something more specific
- Use the ASBO configuration editor to change the attribute name
-
Return to Table Mapper and create the new attribute
-
If using a view:
   -- Alias column to avoid naming conflict
   CREATE VIEW table_with_unique_names AS
   SELECT
       existing_column AS existing_column_v2,
       -- other columns
   FROM source_table;
Cannot Remove Mappings
Symptoms: - X button doesn't respond - Mapping remains after clicking remove - Error when trying to unmap
Resolution:
- UI refresh:
- Close and reopen the Table Mapper
- Refresh the browser page
-
Try clicking the X button again
-
Check for dependencies:
- Some mappings may be protected if used in RN/RD configuration
- Verify the attribute isn't marked as required or locked
-
Check if the attribute is used in any business rules
-
Alternative approach:
- Save the current state and exit Table Mapper
- Edit the ASBO configuration directly
- Remove the
column_metadata_namevalue for the attribute - Return to Table Mapper to remap if needed
Impact of Anchoring on ASBO Lifecycle
Understanding how anchoring affects the ASBO throughout its lifecycle is important for effective management.
Structural Definition
Once anchored, the ASBO's structure is permanently defined by the table used during anchoring:
- Column snapshot: The structure reflects the table columns at the moment of anchoring
- Immutable base: This structure cannot be changed without re-anchoring
- Validation basis: All future environment mappings must match this structure
Structure Permanence
The structure established during anchoring serves as the canonical definition. Even if the source table changes later (columns added/removed), the ASBO structure remains fixed unless you re-anchor.
Environment Mapping Compatibility
After anchoring, any additional environment mappings you create must have table structures that match the anchored structure:
- Validation enforcement: BizMetry validates new environment mappings against the master structure
- Column matching: All columns from the master must exist in new environment tables
- Type compatibility: Data types must be compatible across environments
Cross-Environment Consistency
If you anchor to a DEV table and later want to create a PROD environment mapping, the PROD table must have the exact same structure (column names and compatible types) as the DEV table used for anchoring.
Resource Import Capability
Anchoring directly enables resource import functionality:
- Before anchoring: Cannot import resources from database
- After anchoring: Can import resources using the established mappings
- RN/RD configuration: Becomes possible only after anchoring
Anchoring vs. Environment Mapping
It's important to understand the distinction between these two related concepts:
Anchoring (Master Mapping Creation)
- Purpose: Initially links an ASBO to a physical table
- Occurs: Once, when first connecting an ASBO to a database
- Creates: The master environment mapping
- Defines: The canonical structure for the ASBO
- Requirement: ASBO must be unanchored
Environment Mapping (Additional Mappings)
- Purpose: Links the same ASBO to tables in other environments
- Occurs: Multiple times, after initial anchoring
- Creates: Secondary environment mappings
- Validates: Against the master structure
- Requirement: ASBO must already be anchored
Workflow Example:
- DEV Environment: Anchor ASBO to
dev_db.clientstable (creates master mapping) - QA Environment: Create env mapping to
qa_db.clientstable (validates against master) - PROD Environment: Create env mapping to
prod_db.clientstable (validates against master)
Related Topics
- Understanding Environment Mappings
- Creating a New Environment Mapping
- Editing an Environment Mapping
- Deleting an Environment Mapping
- Importing Resources from Database
- Configuring Resource Name (RN) and Resource Description (RD)
- Configuring Datasources
- Managing Environments
- Resource Type Configuration
- Table Structure Validation
- Troubleshooting Import Issues