Cloning a Profile
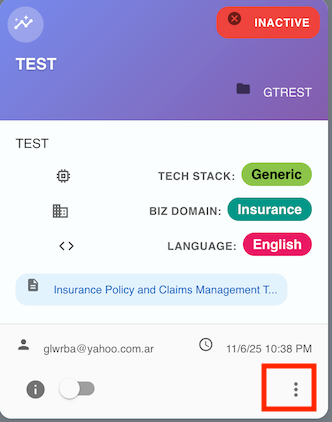
In BizMetry, the option to clone a profile allows you to create an exact replica of an existing profile's configuration and structure. This feature is accessible from the profile tile via the ellipsis menu (⋮) at the bottom-right corner.
Cloning is useful when you need to replicate a working configuration for different environments, teams, or testing purposes without manually recreating all settings.
How to Clone a Profile
Step 1: Locate the Profile
Navigate to the Home screen and find the profile tile you want to clone.
Step 2: Open the Profile Menu
Click the ellipsis menu (⋮) located at the bottom-right corner of the profile tile.
Step 3: Select Clone Option
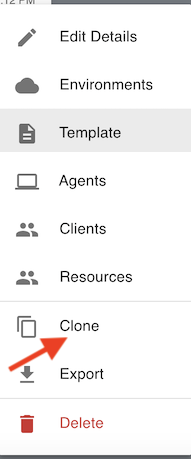
From the contextual menu, select "Clone Profile".
Step 4: Automatic Cloning Process
BizMetry will immediately create a cloned profile with an automatically generated name in the format:
[Hexadecimal] Copy of <Original Profile Name>
Example:
If the original profile is named AI Chat Production, the cloned profile might be named:
[A3F7B2] Copy of AI Chat Production
The hexadecimal prefix ensures uniqueness and helps you track multiple clones.
What Gets Cloned
When you clone a profile, BizMetry creates a complete copy of the following configuration elements:
Elements Copied to the Clone
- Profile Details - Name (with clone prefix), project name, and description
- Telemetry Template - Complete template structure including all definitions
- Environments - All environment configurations (Dev, QA, Prod, etc.)
- Agent Configurations - Agent settings and deployment configurations
- Client Definitions - All registered client types and instances
- Resource Definitions - All registered resource types and instances
- Domain Configuration - Business domain and technology stack settings
- Frame Types - Telemetry frame type definitions
- Attribute Types - Resource attribute definitions and metadata
Elements NOT Copied
The following data is not copied to maintain independence between profiles:
- Historical Telemetry Data - Data belongs to the original profile's operational history
- Captured Metrics - Metrics are time-bound to the original profile
- Agent Logs - Logs are specific to the original agents' operations
- Active Agent Connections - Agents must be redeployed for the new profile
- Analytics Dashboards - Dashboards will be empty until new data is collected
- KPI Calculations - KPIs will recalculate based on new telemetry data
- Alerts History - Alert history is not transferred
Clean Slate for Data
This separation ensures that the cloned profile starts with a clean slate for data collection while preserving all structural and configuration elements.
Agents and Infrastructure
Once the cloning is complete, the new profile can be managed separately from the original.
New Agents Required
Even though agent configurations are cloned, you must download and deploy new agent instances for the cloned profile.
The cloned agents are completely independent from the original profile's agents and must be installed separately on your infrastructure.
To deploy agents for the cloned profile:
- Navigate to the Agents section in the cloned profile
- Download agent packages for your target platforms
- Deploy agents to your infrastructure
- Verify agent connectivity and status
Post-Cloning Steps
After successfully cloning a profile, follow these steps to make it operational:
Step 1: Rename the Profile (Optional)
By default, the cloned profile receives an auto-generated name. You may want to rename it to something more meaningful:
- Open the cloned profile's detail view
- Click "Edit Profile"
- Update the profile name, project name, and description
- Save changes
Example naming convention:
- Original:
AI Chat Production - Clone:
AI Chat StagingorAI Chat Testing
Step 2: Review and Adjust Configuration
Review the cloned configuration and make necessary adjustments:
- Update environment names if needed
- Modify client or resource definitions for the new context
- Adjust frame types if requirements differ
- Update domain or stack settings if applicable
Step 3: Deploy New Agents
Download and install agents specifically for the cloned profile. Agents from the original profile cannot be reused.
Step 4: Configure Environment-Specific Settings
Update any environment-specific configurations:
- API endpoints
- Database connections
- Authentication credentials
- Network settings
- Regional configurations
Step 5: Start Data Collection
Once agents are deployed and connected:
- Enable the cloned profile
- Verify agents are transmitting telemetry frames
- Monitor initial data collection
- Validate metrics and KPIs
Common Use Cases for Cloning
1. Environment Replication
Scenario: You have a production profile and need an identical setup for staging.
Solution: Clone the production profile, rename it to "Staging", and deploy agents to your staging environment.
Benefits:
- Consistent configuration across environments
- Reduced setup time
- Minimized configuration errors
2. Testing and Experimentation
Scenario: You want to test template changes without affecting production monitoring.
Solution: Clone the production profile to create a safe testing environment.
Benefits:
- Risk-free experimentation
- Ability to compare configurations
- Easy rollback if needed
3. Team or Project Segmentation
Scenario: Multiple teams need similar monitoring profiles with slight variations.
Solution: Clone a master profile and customize for each team's specific needs.
Benefits:
- Standardized baseline configuration
- Team-specific customization
- Simplified profile management
Best Practices
Before Cloning
Planning Checklist
Before cloning a profile, consider:
- Is the original profile properly configured and tested?
- Do you need all elements from the original profile?
- Have you documented any custom configurations?
- Do you have infrastructure ready for new agents?
After Cloning
Post-Clone Checklist
After cloning, ensure you complete these tasks:
- Rename the cloned profile appropriately
- Review and adjust all configurations
- Update environment-specific settings
- Download and deploy new agents
- Verify agent connectivity
- Test telemetry data flow
- Configure alerts and notifications
- Document any modifications made
Naming Conventions
Use clear, descriptive names for cloned profiles:
Good naming examples:
AI Chat - Production→AI Chat - StagingE-commerce Monitoring→E-commerce Monitoring - EU RegionFleet Telemetry→Fleet Telemetry - Testing
Avoid:
- Generic names like "Copy of Profile" (unless temporary)
- Names without context about purpose or environment
- Names that don't indicate relationship to original
Agent Reconfiguration
After cloning:
- Ensure new agents connect to the correct profile ID
- Verify agent authentication credentials
- Test agent connectivity before full deployment
- Monitor agent logs for connection issues
Data Collection Strategy
Although metric data is not copied:
- Plan your data collection approach for the new profile
- Configure retention policies appropriately
- Set up initial baselines and thresholds
- Re-sync agents to start fresh data collection
Cloning vs Creating from Scratch
| Aspect | Cloning a Profile | Creating from Scratch |
|---|---|---|
| Setup Time | Fast (seconds) | Slower (minutes to hours) |
| Configuration Effort | Minimal adjustments | Complete configuration |
| Consistency | Guaranteed identical structure | May vary from original |
| Use Case | Replication, testing | New projects, different domains |
| Learning Curve | Low | Medium to high |
| Best For | Similar environments | New initiatives |